Wednesday, December 30, 2020

Sycamore Tree Removal

Damaged DE
I have a "forest" of trees directly East of my EME antennas.  In the winter when the leaves and sap are gone, it seems not to be a huge problem to my moonbounce operations, but in the spring and summer it provides a "brick wall" that keeps me from hearing all but the very strongest EME signals.   Two of these trees (directly behind the house) are Sycamores.  It turns out that Evelyn is severely affected by the dust these trees develop under their leaves in the summer.  If she steps out on the back porch, she will start exhibiting an allergic reaction in less than a minute!  Thus, these trees HAVE TO GO!

Once we decided to have these two Sycamores removed, we chose RealTree Tree Services (a local tree service) and they were able to schedule the removal for today.  I told them we just wanted to "drop" the trees over the lip of the hill where they sat.  Therefore they did not need to be cut up nor did we need the stumps ground down.  This kept the costs down.

These two trees were directly East of my EME array and provided significant blockage from 70° to 110° in Azimuth. This was the direction of my MoonRise and that's where I need to see the moon to be able to work stations in Europe. In the photo on the Top-Left you can see how close my antennas are to these trees even when the antennas are turned broadside to the trees.  And you get a bit of an ideal of how tall the trees are.  The tree cutters estimated the largest one was 65-feet tall.  The image on the Center-Right shows a better view to indicate the height of the trees.

Over the last 3 years I have been on EME, these trees have grown to the point where they prevent my antennas from pointing in their direction.  I first noticed this early in February of 2020 when my SWR suddenly shot up.  I tracked that problem down to the fact that the trees had reached out and GRABBED the driven element of one antenna and actually pulled it apart.  (See the image on the Top-Right of this Post.)  Click on any image to see it larger.

For multiple reasons I asked my Grandsons (Owen and Grant) to come down today to help out.  I knew they could clean the debris from the yard and could cut any of the trees that fell across the "trail" we used to access the HF tower.  They showed up about 8:15 a.m. and brought their friend, Logan, as well.  Evelyn had made a BIG breakfast for them with ham, eggs, biscuits, fried apples, hash browns, and hot chocolate.  After they ate (and the tree service had not arrived) I had them do a small amount of tree trimming at the mailbox.  Later I had them check our whole house generator and replace the battery in it.

When the tree service arrived, they saw that we had three strong men available so they cancelled their own ground crew.  The one guy that did all the major work then paid my "ground crew" $100 of what he had planned to charge me.  You can see on the Bottom-Left photo my Ground Crew cutting up the large tree.  It fell across the "trail" so they got to work with their chainsaws and cleared the way. Logan is on the left gathering up one of the ropes for the tree service guy.

Click HERE for a 30-second video of the trees coming down.  I was a little slow in starting the video for the large tree falling so it is not included.  That large tree definitely shook the ground when it hit.

There are still a LOT of trees to my East but I'm hoping that by removing these two large trees (which were so close to the antennas that the branches were touching the antenna elements) that my signals toward MoonRise will improve. Maybe it is wishful thinking but I feel like I can see more "sky" than I could before removing these two Sycamores. Time will tell. However, on Thursday morning I can tell there is a great deal more light coming into my bathroom. Those trees were definitely blocking a bunch of sky.

Monday, December 28, 2020

Weatherproof Cable Entry Port

Roxtec EzEntry™ 10/10
When I built my current EME antenna system 3 years ago, I used a PVC box to hold the T/R relay and the LNA close to the antennas (see photo at left.)  Since I was using cables which already had the terminations installed and I did not want to remove those connectors, my only option was to drill a hole large enough for the connector to pass through the wall of the box.  Those holes are marked by Purple arrows in the image.

As I began construction of my new XPOL array, I needed to purchase a new and much larger plastic box to hold the multiple relays (5 this time) and the two new LNA's.  Because I have purchased a pair of matched 1/4 λ cavity LNA's for this system, I need a MUCH bigger box than before.  These LNA's (click HERE to see them) are 17-inches long.

This new system will require FIVE large coaxes plus multiple control wires to enter the box.  In the old system I had THREE large coaxes and needed to drill holes in the box large enough to pass the connectors on the ends of the cables.  I was never able to manage to waterproof those large entry holes well enough to keep water out of the box.  As we all know, water is the enemy of electronic equipment.

Looking for a more elegant solution, I came across the Roxtec EzEntry system.  This solution provides a cable entry seal that can be used to weatherproof pre-terminated cables without the need for removing the terminations.  That is AWESOME! You can use any cables with connectors already installed and be assured the Cable Entry Port is weatherproof and insect-proof.  It is also a system that can be modified to add or remove cables with ease.

Different size cables are easily installed.  To adapt the sealing modules to different cable sizes, simply peel off layers from each half of the blue modules until it fits the cable.  It is important that you leave a  0.1 to 1 mm gap between the halves of the blue module when placed around the cable.  Unused blue modules can stay in the frame for use as "spares" in the future.  During installation all parts are lubricated with the supplied lubricant.  Click HERE for a 5-minute video of the installation process.

Module Installation
Once all the modules and cables have been installed, an integrated compression unit is tightened with a Hex key.  This compresses the modules for sealing, squeezes out the excess lubricant, and the installation is complete.

I was really excited to learn about this product which I believe will greatly improve my ability to keep water away from the relays and LNA's for my new array.  This system is available in many sizes but I decided to go with the Roxtec EzEntry™ 10/10 model.  It allows for up to 10 cables each ranging in size from 0.138-0.650 in (3.5-16.5 mm).  This is more than large enough to accomodate 1/2-inch Heliax which has a diameter of 0.51 inches (12.95 mm.) Overall size of the unit is 2.76 x 6.61 in (70x168 mm) which will easily fit my new box.

I also think it is important to note that you can install the Roxtec EzEntry frame in the box without the blue modules and run the various cable into the box through the frame.  Once everything is connected and positioned, THEN you can install the blue modules to seal the cables.  This makes the process very convenient.

I have found several suppliers of these products online.  The model I have decided to use (Roxtec EzEntry™ 10/10) is available for about $85 including shipping.  I feel that is a super low price to pay in order to weatherproof cables entering my Relay/LNA box.

Thursday, October 1, 2020

Moon Globe

For more than a year I have been serving as an "Elmer" to Carlos, WD6Y, in his efforts to build a 70cm EME station.  An "Elmer" is defined as a mentor; an experienced operator who tutors newer operators.

Recently Carlos sent me a photo of the current configuration of his station.  In one corner of the photo a Moon Globe caught my attention. (See photo at Left.  Click on any photo to see a larger image.)

In my next email to him I added the following post script:

   "P.S. I like the moon globe behind the IQ+ receiver!"

Yesterday my wife picked up the mail and there was a box from Amazon.  She asked what I had purchased and I said, "I'll have to open it and see because I can't remember having any orders outstanding."

Later that night I opened the Amazon box and found a Beautiful Gift Bag from Amazon.  I proceeded to carefully open the bag (so that my wife could re-use it at a later time if she wanted.)  Inside was the box you can see on the Right and I believe THIS is that product on the Amazon web site.

I waited until today to see about putting a battery in it.  But, when I started to open the battery compartment, I found there was just a small plastic tab I needed to remove to activate the included and installed batteries.  One pull and the Moon Globe lit up when the switch was flipped!

It did not take long for me to find a suitable place to put the lighted Moon Globe.  On August 21, 2017, I traveled to Sweetwater, TN, with my great friend, Karl, K8KT (SK) to view the Lunar Eclipse.  I took quite a few images (see the best HERE) but my favorite was the "Diamond Ring" photo and I had that one professionally printed.  As you can see in the photo on the Left, it now prominently hangs on the wall of my shack.  It is also on my EME QSL (see it HERE.)

I was totally SURPRISED to receive this thoughtful gift from WD6Y and can not be MORE THANKFUL!  The gift itself is a minor item but the thoughtfulness of the sender was immense! (Plus, my wife is especially appreciative for the Gift Bag!)

THANK YOU, Carlos!


Monday, August 24, 2020

GridTracker with Logger32

New Ham Radio software continues to appear which adds tremendous functionality to our hobby.  Computer programs for Amateur Radio applications seem to be growing at an exponential rate.  This provides a lot of utility for hams but also comes with a (sometimes steep) learning curve!

Red Path: W8TN to 5Z4VJ

Yesterday I decided to take a look at the program called "GridTracker" and I can report that my mind was officially BLOWN!  I had previously been using JTAlert since the beginning of December, 2019, and was very pleasantly surprised that it helped me work a half dozen New Countries and a couple of New Grids in really short order.

GridTracker performs similar functions.  JTAlert interfaces with WSJT-X or JTDX and provides audio and visual alerts for stations you may need for various awards and you can find it HERE.  GridTracker does the same thing but includes a graphical (map) interface which is WAAAAAY COOOOL!  On the right you can see the map showing the paths between stations I could hear on one period on 20-M yesterday.  The Red path showed up while I was working 5Z4VJ.  (Click on any image to see it larger.)  Notice that I had it display the position of the moon (at that time just off the West coast of South America.) Hover your mouse over the moon and you will see the Azimuth and Elevation for the moon from your QTH.

To begin learning about GridTracker I found a video on YouTube by Josh, KI6NAZ, who posts a lot of videos under the heading of "Ham Radio Crash Course."  This particular video is 1-1/2 hours long and has Josh interviewing the creator (author) of GridTracker, "Tag" Loomis, NØTTL.  You can see that video HERE.

Even though I was watching the above video, I still spent SIX HOURS getting GridTracker up and running and trying to understand some of its features.  The reason I placed the "WOW!" graphic above is because the functionality (and complexity) of this program is HUGE!  I have only scratched the surface of what it will do and what I have seen is just phenomenal.  In fact, I would stop the video every so often and use what I just saw/heard for learning about my installation.

You can download GridTracker HERE and rather than printing all the features in this Blog, I will just refer you to that page.  Suffice it to say that GridTracker is a companion program for WSJT-X or JTDX.  It listens to what those programs decode and displays that information on a map.  It also interfaces with your digital log and will give alerts for stations you have not worked or have not confirmed.  Say for example you are working on your W.A.S. award, it's nearly impossible to just look at what WSJT-X (or JTDX) decodes and know where a particular station is located.  GridTracker has a database of all U.S. hams and compares their call to that list.  It can then display the information for that station for you.

Note that I just said "display that information."  BOY, that is an understatement!  GridTracker can display more information than you can even imagine.  And, that is one of the keys to the utility of this program.

I looked for an online "manual" for installing the program and what I found was a PDF file (find it HERE) for Version 1.18.0318 and the current version is 1.20.0821.  In the YouTube video "Tag" says this information was written TWO YEARS ago and is out-of-date.  Still, it is a bit of a start.  "Tag" has a real job and works on improving GridTracker on the weekends but it seems to be evolving very quickly.  The YouTube video was created just 3-1/2 months ago and I found a TON of things that were different in the current version.


Settings for Logger32

Lightning Strike Alert Settings

I won't try to give a step-by-step description of how to install this program but, it is really not that hard to do.  For those with limited screen real estate, there are some things I can suggest to help out.  Right off the bat, you can shrink down the WSJT-X window vertically because you no longer need to see a LONG list of stations, GridTracker will take care of that for you. In the upper left you can see I shrank mine to about 5 lines tall.  Next, if the GridTracker map takes up too much room, you can grab the left side of it and shrink it to the right to just leave the control panel.

There is a grid of 18 buttons in the lower right of the control panel.  Just above that grid is a button called "Call Roster + Award Tracker."  Click on that and position the window that opens below your WSJT-X window.  On the Call Roster there is a menu screen with many selections.  Once you select what you want, Right-Click in the Black area and choose "Hide Controls."  To get that menu screen back, Right-Click  to the right of the word "Callsign" or any blank part of the menu bar and choose "Show Controls."  If you Left-Click on any column header in the Call Roster, the contents will be placed in order.  For example, click on the DXCC heading and all the same countries will be grouped together and alphabetically.  Click again and the column will change between "Lowest to Highest" to "Highest to Lowest."  When you are finished, click on the "Age" column to put the spots in order with the most recent showing first.

In that "Grid" of 18 buttons, the "Settings" button is at the right end of the second row.  It looks like two gears meshed together.  This is where you access most of the controls for GridTracker.  There are 11 tabs on that screen to organize the settings in a logical manner.


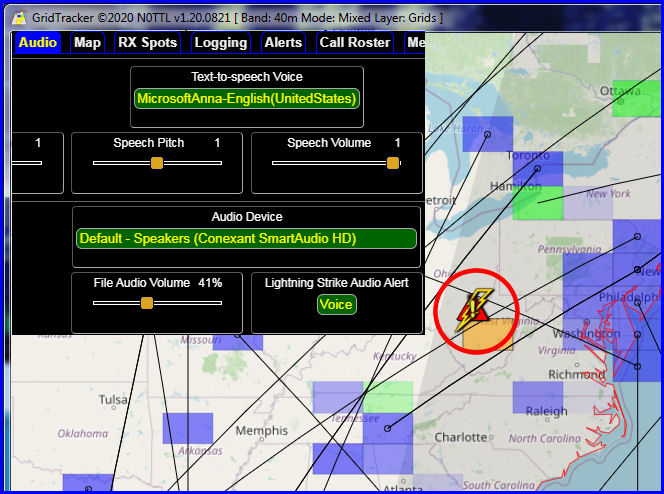
Once you set up the Audio Alerts, you will get a pleasant female voice saying "New State" or "New DXCC" or whatever alerts you have enabled.  There is also a Button for Lightning Strikes!  I thought this was a really nice feature.  It will indicate on your screen and play an Alert sound if lightning is within (I think) 30 miles from you.  (See the "Lightning Strike Settings" image above.)  So, I turned that on but nothing seemed to happen.  An hour or so later a HUGE sound burst from my speakers and nearly cause me to lose control of my bladder!  It was the Lightning Strike audio alert (default is set to "Long") and the volume level default was set to 100%.  I managed to find the controls for that under Settings | Audio, dropped the volume level to 41% and changed the alert to a "Voice" alert.  Whew!  If you want to hear the original sound, click HERE.

If you want to see how I configured GridTracker to work with Logger32, check out the second image above (on the right.)  It gives the settings I used in GridTracker and the ones I used in Logger32.  Now, spots from WSJT-X (GridTracker) flow into the UDP Bandmap in Logger32 and, when I tell WSJT-X to "log" the contact, it transfers to my Logger32 Logbook.

Use your mouse-wheel to scroll in or out of the Map.  If a country is shown bordered in Red it means you decoded someone calling "CQ NA" or "CQ JA" etc.  Click on Settings | Map and you can adjust a ton of things there and you can even change the map source.  

In Settings | Logging you can tell to get your log from ClubLog, LoTW, QRZ, eQSL, or from a local ADIF file.  You can set a "Button" for many of these on the menu and/or tell GridTracker to get the file at startup.  By mistake I clicked the "Log?" button for ClubLog (see above on the left) and today I find that my QSO from last night has been uploaded to ClubLog!

The place where I have NOT managed to fully understand GridTracker is in how to get it to just display ONLY the spots I am interested in.  I can "hear" the audio alert for "New DXCC" but I can't see the spot in the Call Roster.  I did manage to get it set up to display "New State" and you can see above the settings I used for that.

Press "F1" anytime and you will get a pop-up with all the Hot-Keys like you see in the image on the right.  Right from that pop-up you can print that list.  A push of one of two Buttons will pop-up a window for PSK Reporter for the last 24 hours or a set time to see who has heard you.  OH, there is a text messaging feature built-in where you can send a text to another user of GridTracker.  Maybe you need him on another band or something so just message him.  This only works if he is using GridTracker.

Click on the "Show Stats" button on the end of the top row of Buttons, and the window that opens has more detail about your logbook than you can imagine!  Keep scrolling down to see it all.  You can set GridTracker to pop-up a window from QRZ, HamQTH, QRZCQ or the free "CALLOOK" to give information on the station you are working.  You can see that function during the YouTube video above.

Click on the button that looks like a Gold Cup and toggle between EIGHT different "Overlays" for various awards.  This will show graphically (on the map) what Continents, CQ Zones, ITU Zones, States, DXCC Entities, Counties, Grids, etc. that you have worked.  Just zoom in with your mouse for more detail.  Hover your mouse over the Grid that is shown and see a pop-up of those stations you have decoded from that Grid.

I know I have covered only PART of the functionality of this program here so you can see why my mind was totally BLOWN yesterday.  It did take a little time to get this set up, and I know I need to figure out how to display only the spots I want, but the program is working GREAT without any "Gotches" so it seems to be a VERY well-written piece of software.

On the left above is a list of the items that need to be configured in WSJT-X under Settings.  These are just the UDP settings that worked for me - your mileage may vary!

So, this is my "overview " GridTracker.  I will continue to be learning how to work this going forward but I see that for many folks, this will be a WONDERFUL addition to your software stable.

Wednesday, March 11, 2020

FINALLY! Reached the 2,500 Level on the ARRL Challenge

Thirteen years after I first achieved the basic ARRL DXCC Challenge Award with 1,000 confirmations, I have now reached the 2,500 confirmation plateau.  When the envelope arrived with my 2,500 Medallion, it was a feeling quite a bit more exciting than receiving the QSL for an All-Time New One! (See photo of my 2500 Medallion at left - Click on any photo to see a larger image.)

Once I took the photo on the left, I pealed off the 3M backing tape and affixed the 2,500 Medallion to my DXCC Challenge Award.  You can see the on the right.  This plaque hangs right on the wall as you enter my shack!

The way this award is figured is by counting your CONFIRMED "Band-Points."  Each "Band-Point" is earned by working a country on one band and getting it CONFIRMED.  Since this award applies only to the 10 bands from 160 through 6-M (60-M does not count), and since only "Current" countries (entities) are counted, when you multiply those 10 bands by the current maximum number of countries (340) you find that the maximum number of "Band-Points" you can achieve is 3,400.  But, to reach that level, you would need to work (and CONFIRM) each and every country in the world on each of those 10-bands.  Imagine trying to confirm 340 countries on 6-M!

Below is the basic rules statement for the DXCC Challenge Award as found on the ARRL web site:

"The DXCC Challenge Award is earned by working and confirming at least 1,000 DXCC band-points on any Amateur bands, 160 through 6 meters (except 60 meters). Certificates are not available for this award however, there is a distinctive wall plaque available to display your achievement. Plaques can also be endorsed in increments of 500 additional band points. Deleted entities do not count for this award."
Should you manage to reach the rarefied height of having 3,000 Confirmations, your "Medallion" would look like the photo on the left.  It is difficult for me to imagine my achieving that level but, as I make this post, I have 2,513 Confirmed and am waiting on another another 13 QSL's for stations already Worked.  So, only 474 more to go - Never Give Up, Never Surrender!