Showing posts with label Antennas. Show all posts

Saturday, January 31, 2026

23cm EME Equipment - Block Diagram


Above is a block diagram of my 23cm EME station.  Click on it to see a larger image.  Note that the Leo Bodnar GPSDO injection board is actually installed inside the Icom IC-9700.  (See this Post - Leo Bodnar Installation)


All my 23cm EME Equipment "lives" on a 3-shelf rolling cart which stays in the garage along with my folding dish antenna.  When I plan to operate on EME, I simply roll out the cart, install the 2.4m folding dish, and connect the cables.  There are 3 cables from the Sub-Lunar SL-1 Az-El rotors to the WinTrak controller - the SEI controller Bus plus the Azimuth and Elevation power cables.

Then there are the two RF coaxes (Tx and Rx) which connect from the dish to the AG6EE power amp.  The Rx cable connects to the AG6EE preamp and the Tx cable to the OK1DFC Septum feed.  The TX cable connects thru the sensor of the WaveNode RF Power Meter and to the output of the AG6EE power amp.  The Rx cable connects to the AG6EE power amp which has sequenced DC voltage to feed the preamplifier through the coaxial cable.  The preamp also contains a built-in relay and dummy load and it connects directly to a septum or patch feed without the need for an adapter or coax jumper.

Once everything is connected, it is time to calibrate the dish's pointing location.  If the sun is not available, I can use the Theodolite app on the iPhone to get the Az and El of the moon and enter that into WinTrak.  If I have the sun, it is simpler to point the dish at the sun so that the square shadow of the Septum Feed appears on the exact center of the dish.  Then I press the calibrate button on the WinTrak software of the WinTrak controller and it will keep the dish pointed at the moon all the time.

You can see a 45-second video of me setting up the entire station on another Blog post "Setting Up the 23cm EME Station." There is a link in that Post to the video.  Clicking on that post will open in a new window. The setup of all the equipment actually took 19 minutes but the video was compressed to just show the basic operations.

Below is an image showing how the sun's shadow appears on the center of the dish for calibrating the antenna.


Saturday, January 10, 2026

Setting Up the 23cm EME Station

My 23cm EME station is not "permanent."  It is essentially a "portable" station.  All the equipment is located in my garage.  The 2.4m folding dish lays on the floor along with two AC extension cords plus the M&P TX and RX coax cables, and the rest of the equipment is on a 3-layer rolling Service Utility Cart. 

To set up the station, I roll out the utility cart containing the equipment plus an office chair, roll out and connect the AC cords, and power on the laptop, the PowerWerx 13.8VDC supply, and the WinTrak controller.  Next I install the SubLunar SL-1 Az-El antenna controllers on the tripod which is tied down to the edge of the driveway and secured with a spiral Earth Anchor.  Next I mount the folding dish to the SL-1 mounting bracket and connect the SEI bus and Az-El power cables from the SL-1 to the WinTrack Antenna Controller. Next I start the WinTrak app on the laptop. Now I unfurl the dish (a step ladder and yard stick is helpful to make sure the perimeter wire on the dish is not caught on anything.)   Once the perimeter wire is clear, I expand the dish to stress it into a parabolic shape and lock it into place.  Next I tell the WinTrak controller to bring the dish down to where I can connect the TX and RX cables to the OK1DFC Septum Feed and to the AG6EE power amplifier.

At this point, the equipment is connected and ready to use.  I shot a video of this process and then compressed it to a total running time of 45 seconds.  The actual setup of the dish and equipment took 19 minutes.  You can view the video here: Antenna Erection Video.  This video will open in a new window.


Wednesday, October 22, 2025

23cm EME Project - SUCCESS!

WHEEEEEE!  My efforts on building the 23cm EME station have been rewarded in a spectacular manner.  I am now active on 23cm EME for the VERY first time.  Over the last 37 years I have made EME QSO's on 6m, 2m, and 70cm but now with a 2.4m Sub-Lunar folding dish, I have managed my first EME contacts on this new (to me) band.  I was only able to be on for the 2nd night of the October ARRL contest weekend (2025-10-12) but managed 37 contacts, all new initials, in 17 DXCC's with OE9ERC, OK1DFC, RD4D, OK1UGA, K0PRT, G4YTL, N1AV, SP5GDM, HB9Q, OK1KIR, SM6CKU, ES3RF, OK2AQ, DF2VJ, KB2SA, YO2LAM, OK1USW, DK3WG, PA3FXB, GM0PJD, UA1ALD, WA3RGQ, DL0SHF, OH3LWP, SP3YDE, G4CCH, PA0TBR, AA6I, CT1FFU, KH6FA, W3TI, N0AKC, OH1LRY, AC2AC, K5N, W2ZQ, and JJ3JHP.  I had 7 decodes of PYØFBS as strong as -23 and 12 consecutive decodes of HL2/LY3UM (4 of those at -23) but no QSO's resulted with either of these fine DX'peditions. 

Operating Position on my Driveway
Because my QTH is blocked by trees to the East, my operating location is "portable" on my driveway.  The equipment is kept on a 3-shelf rolling cart which I wheel out of the garage to operate.  I am not able to see the moon until it clears my roof at about 22° elevation but I can see it almost down to the western horizon.  My QTH is EM98al in the state of West Virginia (WV).  

My equipment consists of: a 2,4m Sub-Lunar folding dish, OK1DFC Lightweight Septum Feed, Sub-Lunar SL-1 Az-El Rotors, N8CQ's WinTrack, IC-9700 w/Leo Bodnar GPSDO, AG6EE preamp, 200-watts from an AG6EE Power Amplifier, and 6,5m feed lines from Messi & Paoloni in Italy. However, since the station is "portable" there is the possibility that I can operate from other locations.  

I operated the next Saturday (2025-10-18) and made 16 QSO's including 13 more Initials: G0LBK, CX9BT, DL4DTU, PA0PLY, KA1GT, I2FAK, KB7Q, NY1V, OK1VUM, N5TM, F5KUG, VK2JDS, and XE1XA.  That brings me up to 53 QSO's, 50 Initials, and 22 DXCC's after only 2 days of operation on the moon.  Boy, am I fired up with those results!  I know I worked at least a couple of stations using 1,5m "Solar-Cooker" dishes and I worked KB2SA with his 1,0m dish, TWICE!  On the first KB2SA QSO reports were: Sent -21 / Rcvd -24. And, I easily completed a Q65-15A QSO with KA1GT, Sent -17 / Rcvd -15. 

With the overnight temperatures around 7°C both times, I have now ordered a portable hunting shelter to keep the operating position a bit more comfortable!  But, it has now occurred to me that I can actually operate the station remotely from INSIDE the house!  I will be working on that idea next.

Even though I have made hundreds of moonbounce QSO's over nearly 4 decades, the THRILL is still there!  Had any of my neighbors been awake at 12:45 a.m. when I made that first 23cm EME contact, I'm sure they would have heard my yell as I jumped up and down on the driveway!  WHOPEEE!

Thursday, August 7, 2025

Theodolite Application for Locating the Moon

Theodolite is a multi-functional app that combines a compass, inclinometer, rangefinder, GPS, map, and camera with geo-overlay for augmented reality. It's essentially a digital theodolite, allowing users to measure angles, distances, and positions using their smartphone or tablet.  This is the perfect way to locate the moon in azimuth and elevation for pointing the antenna.  I purchased this app from the Apple Store for $9.53 and in my opinion it is well worth that price.

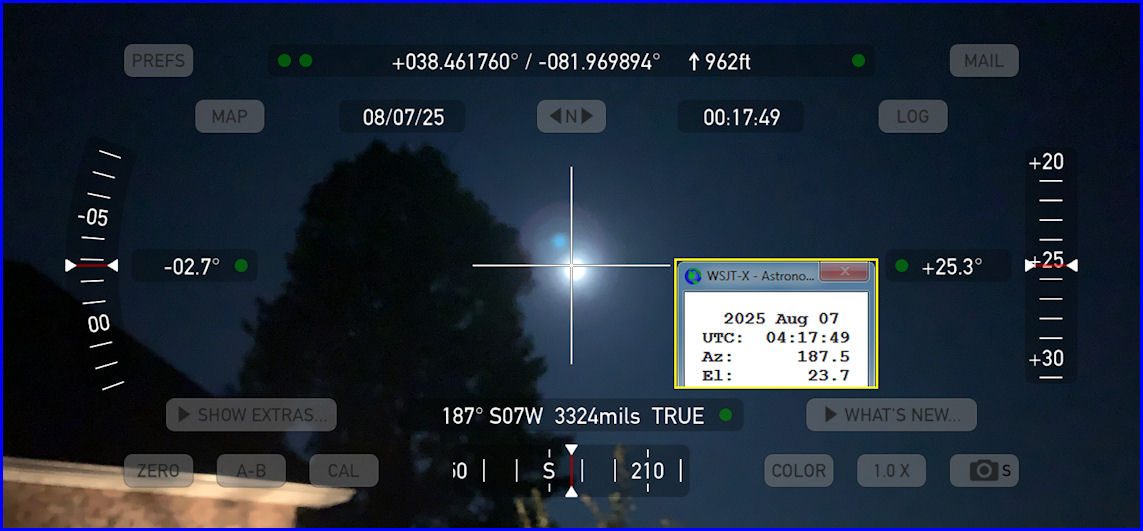
Below is my first attempt at using this app to locate the moon.  Local time was just after midnight and Full Moon is in 2 days so this moon was over 90% illuminated - it is bright!  You can see a tree to the left of the moon and also a portion of the edge of my garage.  This image was taken at the point where I plan to set up my Sub-Lunar Folding Dish.  At the time I took this photo the declination was -27° so the moon was not very high in the sky even though it was nearly due South of me.  You can see that the Horizon Angle on the left shows the phone was tilted 2.7° away from horizontal.  (Click on any image to see a larger version.)

I placed inside the Theodolite image a Yellow bordered box showing the Astronomical Data from WSJT-X for the same date/time.  You can see the app shows an Azimuth of 187° and WSJT-X shows 187.5° and since the moon is actually below the crosshairs, the indicated Elevation Angle on the right (of +25.3°) was a little off from the WSJT-X number of 23.7°  At the top of the screen the app also shows my latitude/longitude and elevation. 

I learned that I might want to set my iPhone on a tripod to keep it steady in the future.  Just holding the phone in my hands it was difficult to center the moon in the app.  Also, you can push the "Zero" button in the bottom left and it will put a box around the crosshairs in the center of the image.  This box changes color from Red to Yellow to Green then White as you get the image lined up with the horizon so the elevation numbers are correct.  What this button does is to zero all angles at a given orientation of the device, thereby showing angles relative to that reference until you tap the button again.  Once you tap zero again the true angles will be displayed and if the phone has not moved, the Elevation Angle will be correct (as long as the moon is centered in the crosshairs!) 

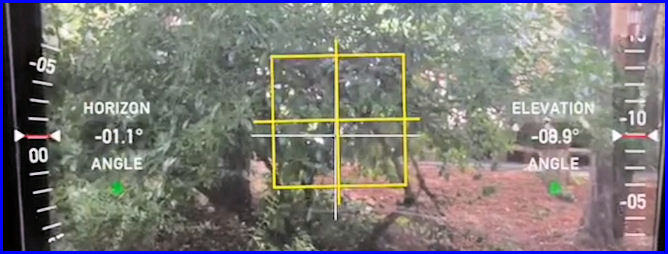
In the example below the Elevation Angle on the right shows -08.9° but the Horizon Angle on the left shows the image is -01.1° from being level.  And, the yellow box shows you are close to being lined up.  If you line up the image and "then" press the Zero button, it will adapt the image so that the Horizon angle is 0.0°


I don't think this app will take much effort to be able to dial in the location of the moon.  Once I have those numbers, I can set up my SL-1 Az-El Positioner to the current moon location and "hopefully" it will then track the moon automatically.  If I don't have visible moon, I "think" I can still use this app to align it with the dish feed and use that as the starting position for the Az-El Positioner.  The Theodolite User Manual is located HERE.

New EME Challenge - 23cm

In the late 1980's I had four CushCraft A32-19 yagis and a kW for my first ever EME activities on 2-M.  I managed to make 5 QSO's (CW) including K1FO and WA1JXN/7 (Now W7GJ!) before the antennas fell.

From 1992 to 1995 I operated 70cm EME beginning with my first ever 70cm EME QSO - DL9KR on 18-October-1992.  This was before WSJT or JT65 were invented so almost all QSO's were CW except for one on SSB with VE3ONT who was operating a 150-foot dish antenna!  I used four K1FO 25-element yagis and a kW and I made at least 74 "Initials" on 70cm EME.

In November 2017 I installed two 13-L InnovAntenna yagis for 2-M and with a kW from a W6PQL amplifier, over the next 6 years I completed 345 EME QSO's with 278 "Initials" and 64 DXCC Entities.  That station is now temporarily QRT due to a failure in the elevation mechanism.

In 2022 and 2023 I was able to make a couple of EME QSO's with KJ9I on 6-M.  I was using an 8-L InnovAntenna LFA2 yagi at 28m AGL with up to 1.5kW.  But, although Lance, W7GJ, heard me on 3 of his DX'peditions, I was never able to hear him.

Now, after having completed EME QSO's on 6-M, 2-M, and 70cm, I felt it was time to explore a new EME band - 23cm (also known as 1296 MHz.)  Over the past few years there have been huge improvements in equipment for this band and it is possible to purchase all needed items off-the-shelf without the need to "home-brew" any of the needed equipment.  I had delayed moving to this band for several years because my location was not suitable for a parabolic dish antenna (mounted on the ground) to see the moon in the part of the sky which favors Europe.  Too many trees!  However, Paul Andrews, W2HRO, has developed and is marketing a lightweight, folding parabolic dish which uses space-age RF reflective fabric.  His company, Sub-Lunar, sells folding dishes in several sizes, patch feeds, OK1DFC Septum feeds, WinTrack Software/Hardware from N8CQ, Az-El positioners, and many other products to support EME operation.  This "portable" dish concept allowed me to consider other locations on my lot where I could "temporarily" install the antenna with a better view of the moon.

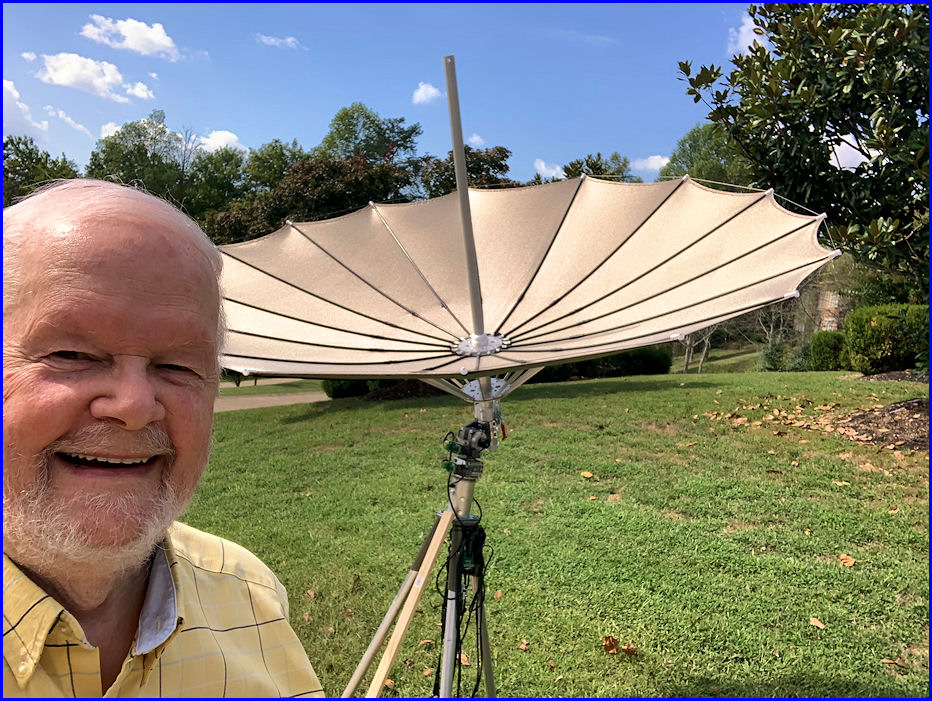
I decided to go with a 1.8m dish (just under 6-feet in diameter) because it was lighter and easier to install and remove.  The 2.4m dish would add about 2 dB to TX and RX signals but I was concerned that I might not be able to handle that larger antenna by myself.  The antenna folds and unfolds like an umbrella!  But it is not weather proof in any of its components and is sensitive to wet and wind!  For that reason, it is a "temporary" antenna.  I plan to only use it when the weather and moon conditions are favorable. UPDATE 2025-08-20 - After talking to several EME'ers and checking with W2HRO at Sub-Lunar, I opted to change my folding dish order to a 2.4m version.  Paul (W2HRO) said he felt I would have no problems with the larger dish.  The earlier models were a little tight but no more.  Bigger is better they say!  -  As it turned out, I was able to install the 2.4m dish just fine!

Considering this would be a "temporary" set-up, I decided to purchase a rolling cart that could hold all the equipment (power supplies, amplifier, laptop, etc.) and thus it would be extremely simple to just roll the cart out of the garage, erect the antenna, connect the feedlines, and be on the air.

A recent improvement in folding dish setups is the OK1DFC Lightweight Septum Feed.  Originally those stations with a folding dish used a "Patch Feed."  But on 23cm (1296 MHz) EME signals use circular polarization.  In order to get circular polarization from a patch feed, you need to incorporate a 90° hybrid to provide circular polarization. However, to switch between LHCP (Left-Hand Circular Polarization) and RHCP (Right-Hand Circular Polarization), a power relay and a set of cables are also required.  A key advantage of the septum feed is its ability to generate both RHCP and LHCP simultaneously!  This eliminates the need for a 90° hybrid.  Also many hybrids are not exactly 90° so that results is less than optimal operation.  And, 90° hybrids are limited in the amount of power they can handle - often only in the 200-watt range. 

Other major components include a preamplifier and a high power amplifier.  Thankfully AG6EE has been building both.  His pre-amp has about 30 dB of gain, with a built-in relay and dummy load - and can connect directly to septum feed without a jumper.  His 23cm amplifier is spec'd for 600W out (max 700W) and splits the input into TX and RX lines, the RX line has sequenced DC voltage to feed the preamplifier through the coaxial cable. 

Since I have not operated on 23cm for 24 years (and all that equipment is gone) I needed to acquire a transceiver to operate on 23cm.  I chose the Icom IC-9700.  There is a know frequency drift problem with that radio on 23cm so I ordered a GPSDO from Leo Bodnar to incorporate inside the IC-9700 with an external GPS antenna included. In order to install the Leo Bodnar injection board inside the IC-9700, it is necessary to open the case of the radio.  That requires a special screwdriver. A P2x100 #2 JIS Cross Point Impact Screwdriver is what I ordered from Amazon. And, a laptop would also be required so I purchased a refurbished Dell 5500 Win10 from Amazon utilizing an 8th Generation Intel Core i7 with a 512GB SSD Hard Drive and 32GB DDR4 RAM.  To power the radio and the pre-amp I bought a PowerWerx 30A 14.1 VDC Power Supply, and to power the amplifier, I purchased a Mean Well RSP-2000-48 VDC Power Supply from DigiKey.

Several other minor items were also purchased - a 23cm Coaxial Dynamics 1kW element for my Bird 43 wattmeter, a WaveNode® WN-2m digital wattmeter with 500-watt 23cm sensor, 6.5m feed lines from Messi & Paoloni in Italy, a 50-foot 12/3 extension cord, an AC power strip, a spiral ground anchor to hold the dish tripod down, an LED keyboard lamp, a Shielded/Filtered USB Cable for the IC-9700, and so on.  Then a fair amount of time was spent downloading and installing multiple pieces of software on the computer.  I worked on this project every day with the goal of being operational on 23cm EME in time for the ARRL EME Contest on October 11/12.  Fingers crossed! = SUCCESS!  I am now operational on 23cm EME!!!!!!!

Monday, June 5, 2023

Messi & Paoloni Coax Presentation

Samples of Messi & Paoloni Coax
At the June 3, 2023, meeting of the West Virginia DX Association (WVDXA) I made a presentation about Messi & Paoloni Coax Cables and the M&P connectors.  I have been using M&P coax for a few years now and am AMAZED at their quality and performance.  On my last order I asked Christian Messi to send me a sample or two of M&P cables and I would show them off to some local radio clubs.  Well, he sent me NINE (9) samples!  WOOF!

So that meant I had to put them together in a way that would show off their characteristics.  I decided to mount them on a display board with the names of each cable above.  You can click on the image above to see it in a larger size.

During the meeting I was given time to describe the Messi & Paoloni cable and connector lines.  Most of those in attendance were not familiar with the brand.  In addition to the above display, I had prepared a handout which was distributed to all those attending.  Click Here to download that handout in PDF format.  Obviously I am a "fan" of M&P products and do not hesitate to recommend them.

Not only did I discuss the varieties of coax which M&P supplies but I also spent a little time describing their excellent line of connectors.  I focused on the UHF-EVO improvement to the standard PL-259.

W8TN Making the Presentation
At least one person there was so impressed he said he was planning to replace all of his station coax soon and would be replacing all of them with M&P products!  So, that was a good result.  If anyone has any specific questions about M&P coax and connectors, just contact me at your convenience.  And, I am available to make this presentation to your local radio club if requested.


Wednesday, September 7, 2022

Another Cable Order from Messi & Paoloni

As I am getting close to completing my new antenna array (a pair of 14-element InnovAntenna XPOL yagis) I wanted to make sure I had the best possible cable to connect my antennas to my station.  Of course, in my opinion, there is ONLY ONE choice for that - Messi & Paoloni from Italy.  If you visit their website you will see a pop-up showing that you can now purchase their products from GIGAPARTS and BUY TWO WAY RADIOS.  However, since I have made several purchases of custom cables direct from M&P, I chose to do that again.

Instead of buying a standard length of a particular cable, I ordered cables to fit the place where I needed them and, I had their best quality "N-Male" connectors SOLDERED on to the ends of the cable.  Since my station is already using the ULTRAFLEX 10/.400" cables to run from the LNA's to the LinkRF IQ+ dual channel receiver, I chose that same cable for my jumpers from the Power Dividers to the T/R relay.  I also purchased a couple of 3-foot jumpers for use in the shack.

I placed the order on August 31 and received all the cables on September 6, 2022 - less than a week from Italy!  It would have been even sooner but the Labor Day weekend intervened.  Below you can see 2 of the cables I ordered (a 1m and a 4m) complete with the "Test Results" for each cable!  AWESOME!


Saturday, August 20, 2022

Custom-Made Driven Element Measuring Tool

In tuning my InnovAntenna LFA 2-M yagis (and later my XPOL antennas) I needed a simple way to measure the Driven Element (DE) dimensions.  The manual for my 2-M antennas says:

Hose clips are ready to place on the driven element sections and need to be loosened to allow the insertion of the end-loop element sections. The loop end sections are easy to identify and once inserted should be tightened to around 0.890m from the inside of the loop section one side, to the inside of the loop section on the other side. This loop will need adjusting once the antenna is complete with the above measurement being the starting point.

According to the manual for my 2-M antennas above, the DE loop sections should initially be set to around 0.890m from the inside of the loop section on one side, to the inside of the loop section on the other side.  I found it really difficult to measure this distance across the square boom while I was trying to adjust them.  So, I measured the width of the boom at 38mm and deducted that from the 890mm total distance (890 - 38 = 852mm).  Dividing that by two gives 426mm from the inside of the DE to the closest side of the square boom.  

The solution thus became obvious.  Since the antenna boom is square, a tool could be built to measure from the closest side of the boom to the inside of the DE loop.  So I took a short length of 1/2" X 1/2" wooden molding and taped a printout of a millimeter scale to it.  The printout of the mm scale was not 100% accurate but I decided it would serve perfectly as a "relative" measuring tool.  That is, if I measure one Driven Element at 426mm according to this tool, I could measure another to 426mm and they would be the same.  It would not matter if the distance was actually 427mm.  Just being able to adjust the corners of each DE loop to be the same distance and then adjust the DE loop on the other side of the boom to be the same was my goal.  I positioned the printout on the wooden stick so that the "Ø" on the printout was exactly 300mm from the far end.  That made it easy to adjust the DE's to the initial setting of 426mm (just add 300mm to the scale reading) and then move the DE's in easily repeatable amounts.  (Click on any image to view a larger size.)

Custon-Made Driven Element Measuring Tool

All I had to do was to place the end of the wooden stick on the side of the square boom and then measure to the inside of the DE using the scale on the measuring tool.

DE Measuring Tool in Use

Once I tightened the hose clamp (Jubilee Clip in the U.K.) on one end of a DE, it was extremely easy to move the measuring tool to the other end, adjust it to the same measurement and then tighten that hose clamp.  This made the adjustable portion of that DE square to the boom.  Then I just used the same measurement on the tool to set the DE on the other side of the boom.  Simple!  I sure wish I had thought of this back in 2017 when I was trying to adjust my 13-L antennas!

And, after I posted the above, Carlos, WD6Y made a similar tool for 70cm:


Sunday, June 27, 2021

FINALLY the 8-L 6-M InnovAntenna is UP!

8-L at 95'AGL Through the Trees on Rohn 45
This project has been a long time coming.  In July 2015 the 8-L 6-M InnovAntenna yagi arrived from Great Britain.  I had spoken to Justin Johnson, GØKSC, at the Dayton Hamvention in May and placed the order.  But it was not until August that I was able to construct it.  Check THIS Blog Post for those details.

The build took place at the QTH of my good friend, Tim, K8RRT, because he had much more available room than me.  Once the antenna was built, I raised it to about 39-feet on Tim's Rohn 45G tower to proceed with tuning the antenna.  Check THIS Blog Post for the details on the antenna tuning.

Once I had the new antenna at my QTH, I was not able to get it up on the tower immediately.  My tower is located in the woods behind my house (down over the hill.)  The base is located about 35 feet below the level of the house and it is quite difficult to get to and work around. Still, as Lance, W7GJ, was about to operate a 6-M EME DX'pedition from V6M, the Federated States of Micronesia, I felt the burning need to try and work him even if the antenna was not atop the big tower.  So as any reasonable ham would do, I erected the antenna temporarily in my front yard!  Check THIS Blog Post for the temporary installation details.  This did not please the Homeowner's Association but the really good news is that I WAS HEARD by Lance!  I was  not able to complete the QSO but still, it was 1/2 of a 6-M EME QSO in my book!

I still could not find a way to get the antenna up onto the tall tower.  It lay on the patio for the next 3 years. But in the summer of 2018 I really wanted to join in on all the DX fun (it had been 4 years since I worked a New One on the Magic Band) - and, I hoped to just maybe work a Japanese station on 50 MHz.  So, I took down the EME antennas from the short tower at the house and put up the 6-M antenna. See a photo on the Photo Link below.

In the 3 weeks the antenna was on the EME tower, I managed to work ELEVEN New Ones bringing my 6-M total to 121.  This certainly proved to me the value of this antenna.  However, it had to come down before it was damaged.  I had just "roped" it to the side of the EME tower and any windy day or a thunderstorm threatened to damage the antenna.  Still, it had proved its worth!

Move forward three more years to the present and I finally decided that I was just not going to be physically able to work on my 85-foot tower myself.  So, I contracted with a firm who has done a lot of antenna work for local hams.  I had them remove the damaged 4-L SteppIR and the 12-foot mast that supported it.  Then they pulled up the new 15-foot mast (See THIS Post for info on the new mast,) the 1-5/8" Heliax, and then pulled up the 8-L 6-M InnovAntenna to it's new location at 95-feet AGL.  

It took a week to complete this project.  You can Click HERE for Photos of this project.  Click on the "i" within the circle to read a description of each photo.  Then click on the first photo to move through all the images in a larger size.  Also, Click HERE for Video (less than 6 minutes) which is a compilation of several shorter videos shot while the antenna was being pulled up from ground level to its final resting place.

Day #1 of the project was me with my grandsons, Owen and Grant, clearing the area, putting together the sections of the beam, me breaking the balun!, and the need for me to make TWO trips up and down the hill.  WHEW!

Day #2 had Joe Beam and his crew come and remove the 4-L SteppIR antenna.  Thank goodness the grandsons, Owen and Grant were also here to help take apart that monster.  I only had to make one trip up and down the hill and don't think I had another one in me.  After accidentally breaking the balun, I followed the advice of Charlie, N8RR, and managed to re-build the balun with a new piece of coax plus using the 25 ferrite toroids from the damaged balun.  You can see the result of that re-build on the above Photo Link.

Day #3 started with "Marvin" of Joe's crew climbing and "limbing" a bunch of trees to give enough room for the antenna to go up and to later rotate.  Due to the physical exercise of the previous days, I was not able to make it outside until noon except to greet the crew upon arrival.  After the Aleve(tm) kicked in, I went out and made one more trip over the hill to help with pulling up the 8-L 6-M beam.  Owen ran the tag line and both of Joe's crew were on the tower.  Joe was at the top of the hill running the winch.  You can see a photo of the antenna on its way up on the Photo Link above.

Day #4 "Marvin" and "Paul" came to trim one more tree and to pull up the 1-5/8" Heliax.  It was a "Good News - Bad News" kind of day.

My Grandson Owen and I rolled out the 190-feet (or so) of 1-5/8" Heliax with "Paul" from Joe Beam's crew holding the end which had the 7/16" DIN connector which Tim and I had installed.  Click HERE for details on that.  This would be the end at the top of the tower.  We had to use nearly all the neighbor's yard clear to the street for the cable to unroll the entire length of cable.

Right away Paul hooked up the pull rope and using the winch, pulled the Heliax up to the top of the tower.  "Marvin" was up on the tower to secure the cable.  This went VERY fast!  I can not imagine trying to haul this cable up by hand.  It weighs 0.72 pounds per foot so the 140-feet or so that we used today weighs about 100 pounds.

At this point Paul went up the tower to attach the "hangers" to secure the Heliax to the tower plus carry the weight of that cable.  Marvin started climbing a tree that had to be cut back and began working on that.  Owen took off to the doctor because he picked up a serious case of poison ivy or poison oak when he was here on Day #3.  He ended up with a steroid shot and is feeling somewhat better.

I then began installing the female N-Connector on the 1/2-inch Heliax which runs under the back yard and into the shack.  Just to make sure this system would play, I put a small amount of my blood onto my work!  Before I finished that connector, my grandson, Grant, showed up and he helped me saw off about 42 feet of the 1-5/8-inch Heliax which was surplus to this installation and then helped me use the Commscope-Andrew Easiax Automated Prep Tool (CPT-158U) to prepare this big feedline for the connector installation.  That went quite well and the big Heliax now has a 7/16" DIN connector on the shack end as well as the antenna end.
 
At this point, Joe Beam showed up just as his crew was finishing and packing up.  Grant left to go do other things.  After Joe and his crew left, I finished the connector installation on the 1/2-inch Heliax and connected the 1/2" to the 1-5/8" cables with a 10-foot jumper of 1/2" SureFlex Heliax with an N-Male on one end and a 7/16" DIN Male on the other.  

I then taped Ziploc bags over each of the connector joints - just in case.  As it turned out, as I was picking up my tools, it started to rain!  Not a lot but it was enough to make me glad I had covered my butt so to speak.  I will apply a more permanent weatherproofing solution to those joints at a later time.

I quickly hooked up the new antenna and did an SWR check.  Things looked REALLY good.  Remember my antenna was tuned for the low end of the band for SSB and CW but my tuner will adjust the SWR at 50.313 to 1:1 so, no worries!

Logger32 Beam Heading
50.100   1.1:1
50.150   1.2:1
50.200   1.3:1
50.250   1.3:1
50.300   1.4:1


Now here is where the Bad News comes in. Just after checking out the SWR, I found my rotor did not rotate.  That was a huge BUMMER!  I was trying to hear the K8MMM beacon and went to rotate the antenna a little to the West and the rotor controller gave me an "E 1" error message.  At this point I called it quits for the day.  But when I came back later, I found that the rotor would rotate just fine in the ClockWise direction but not at all in the CCW direction.  Possibly that was just an issue with the CW wire between the controller and the rotor.  I also found that I had picked up two ticks on my left leg.  Thankfully neither one infected me with any "tick-borne" diseases.

On Monday, "Paul" came to help figure out the rotor issue.  He climbed the tower checking the rotor cable as he went and found no problems.  Where the cable attaches to the pigtail coming out of the rotor I had used a pair of "Trailer Plugs."  Paul found some corrosion there and by plugging/unplugging the connections plus a little cleaning of the pins, the rotor now turns just fine.  As you can see in the image on the right, my M2 Orion RC2800PX rotor controller interfaces just fine with Logger32 to tell me where the antenna is pointed and to allow me to quickly and easily rotate the antenna.  Click HERE for a 20-second video of this feature in action.

I think this installation will play very well.  There is approximately 262-feet of feedline from the antenna to the radio including all jumpers.  The combination of 1-5/8" and 1/2" Heliax pieces should result in a total feedline loss of 1.35 dB which includes an allowance of 0.50 dB loss for 10 connectors (0.05 dB per connector.)

On June 26, 2021, just 5 days after installing the antenna the above station was decoded. This 9K2NO (Kuwait) entity would be a New One for me (No. 124 on 6-M) but propagation did not last long enough for a QSO.  I think at this point I will say this antenna project was definitely worth the effort!  Bring on the 6-M DX!!

Saturday, June 5, 2021

1-5/8" Heliax Feedline & Mast for 6-M Beam Installation

Progress continues to be made on the 2021 Antenna Project to put the 8-L InnovAntennas 6-M yagi (11.7m, or 38.4-foot boom) up on top of my 85-foot tower.  

On May 24, 2021, Grandson Owen drove me to Metals Depot in Winchester, KY, with a trailer, to pick up the new mast - a 15-foot length of 1-1/2" Schedule 80, A500 Uncoated Steel Pipe, 1.90" O.D. x .200" wall x 1.50" I.D. (T511280 Structural Steel Pipe.)  I had to go with this 1.9" O.D. pipe over a 2-inch O.D. mast because of the size of the top section of my tower.  On the right you can see the photo of the new mast on the trailer.  The inset shows a close-up of the end of the mast.  To prevent the mast from rusting, grandsons Owen and Grant have sanded, primed and painted the mast as it was uncoated when I bought it.  (Click on any photo to see a larger image.)

Thankfully a few years ago I had acquired a length of used 1-5/8” Heliax cable (Commscope-Andrew AVA7-50) which had been removed from a cellphone tower.  Click HERE to see a photo of the Grandsons (Owen & Grant) helping me bring the cable home.  (Yes, they were MUCH younger then!)

The next job was to install connectors on the 1-5/8" Heliax.  These connectors are 7/16 DIN female and each connector is 4 x 2-1/2 inches and weighs 1.7 pounds!  Not your typical PL-259.  You can see an image of one of those connectors on the left.  I had worried about how to install these and recently found that Commscope-Andrew makes a special tool to do this.  Click HERE to see a video of this tool (CPT-158U) in operation.  It is just amazing to me to see how simple it is to use this tool.  After watching that video I decided I just "had" to have that tool for this project.  I found it on eBay (new) for $85 so that was purchased.

Then on June 1, 2021, Tim, K8RRT, came to help me install the first connector.  This will be on the end of the cable that is at the top of the tower.  Once the cable is installed and unrolled to the top of the hill, it will be cut to length and the other connector installed.

On the right you can see me working on prepping the cable to install the 7/16 DIN connector.  Note the red-bordered inset - this is what happens when you fail to wear your gloves!  But, this is a GOOD thing.  As amateur radio lore goes, an antenna will just not work right unless you bleed on it!

I can attest that this method (using the Commscope-Andrew Easiax Automated Prep Tool) is totally the berries!  I have installed connectors many times on 1/2-inch and 7/8-inch Heliax over the last 30+ years and this method beats the dickens out of the old methods!  Cut the Heliax off flush, run the Easiax tool (chucked in a power drill) for 5-10 seconds to remove the outer conductor and trim everything else to size.  Then, use the plastic separator tool to separate the foam from the outer conductor, put the two parts of the connector on the cable, and tighten!  DONE!  You can see the installed connector on the left.

Why did I choose to use such large feedline?  Since the feedpoint of the 6-M beam will be 272-feet from the transceiver/amplifier, I need to minimize the loss in that length of feedline.  For the entire 6-M feedline I will use 46-feet of M&P HYPERFLEX 13/.500" cable to connect the antenna balun to the top of the 1-5/8" Heliax.  Then I will run the Heliax down the side of the tower and up to the top of the hill where my shack is located.  This should take 150-feet of the Heliax.  A 10-foot jumper of 1/2" SureFlex Heliax will connect the 1-5/8" Heliax to the 63-feet of  1/2" Heliax (LDF4-50A) that runs under the back yard, under the house and up to the shack.  A 3-foot jumper of the M&P HYPERFLEX 13/.500" will connect to the amplifier.  

By using these low-loss cables, and taking into account the loss in all the connectors, the loss in 272-feet of feedline should be only 1.36 dB.  Were I to use Belden 8267 (RG-213) cable (an excellent cable), my feedline loss would have increased to 3.95 dB.  Putting 1,500-watts into the Belden RG-213 would result in only 605 watts reaching the antenna.  900-watts would be lost.  By using the above Heliax feedline, the same 1,500-watts at the amplifier would result in 1,097 watts reaching the antenna.  That's an extra 492 watts or 81% increase in power transfer over using the Belden RG-213.  AND, a reciprocal improvement will be seen on received signals.

The next issue was to see if the current antenna rotor would work.  Since the SteppIR antenna had failed some years ago, I disconnected the rotor in order to protect it. This rotor is an M2 Orion 2800 with the RC2800PX controller.  You can see an image of the controller on the right.

First I fished out from behind the operating desk the pigtail from the rotor control box.  It ended in an 8-pin trailer connector and I plugged that trailer connector pigtail into the mating trailer connector on the lightning arrester.  Then I powered on the rotor.  No joy!  I had no directional indication and when I tried to rotate it, I got an "error" message.  Crap!  So, out came the manual and I started to troubleshoot the problem.

Finally, after wasting a couple of hours on the troubleshooting issue, it became aware of the fact that the lightning arrester was not connected to ANYTHING!  The cable to the rotor on the tower WAS NOT CONNECTED to the lightning arrester.  Boy, does that make me feel STUPID!

Now that I knew the issue, I began trying to hook up the rotor cable.  But, I had to now figure out which wire in the rotor cable went to which pin in the lightning arrester.  Rather than destroy a $3,000 rotor, I took my time and triple (or more times) checked my work.  You see, there are 8 wires in the cable going to the rotor.  The first problem was that the colors of those wires do not agree with the manual's "Getting Started" section.  Then I saw that the wires in the rotor cable (which is then connected to a lightning arrester and then connected to an 8-pin Trailer Connector), had even DIFFERENT colors of wire.  The mating trailer connector is then wired to the control box - WITH DIFFERENT COLORS OF WIRE!  What a "cluster" that is!

After I eventually resolved the color code problem, I still did resistance checks on the wire to the rotor JUST TO MAKE SURE I did not fry something. Once I was ready, I turned the antenna 30° and ran over to the window to see that it had indeed moved the antenna.   IT'S ALIVE !!!  WHEW!  What a relief.  Then I moved it back and it rotated the other way.  After working for literally HOURS to get the correct wires connected, my rotor now turns the antenna!  YIPPEE!!!  The problem was that while I HAD made notes of the wires color code when it was installed, my notes were confusing after so many years. It turns out that my notes were correct (color to color.)  If I had just added a little bit of a description, then things would have been so much simpler.  Nevertheless, I can now check off "one more thing" that needed to be done on this project.  Forward, ever forward!

Wednesday, May 26, 2021

More Messi & Paoloni Cable Purchased from Italy

About a year and a half ago I purchased two 25m lengths of M&P ULTRAFLEX 10 for my 2-M XPOL system.  I was really pleased with the product and the speed of service.  http://w8tn.blogspot.com/2019/10/messi-paoloni-coaxial-cable.html  This cable was built in Italy by Messi & Paoloni.   They have been producing cables since 1984 and have received very good reviews.

Now that I am about to install my 8-L 6-M InnovAntennas yagi, I found that I need a 46-foot (14m) length of cable for that project.  This cable will connect from the Driven Element, along the boom, down the mast, around the rotor, and connect to the 1-5/8" Heliax feedline.  Times LMR 600 was suggested as the cable to use but since it has to flex whenever the rotor turns, I began to look for another solution.  In looking at the M&P website, I felt that their HYPERFLEX 13/.500" cable would do as good a job or better than the LMR600. 

LMR 600 has a solid center conductor and the M&P cable has 37x0.56mm copper wires.  I felt this was better for a cable that was being flexed as the antenna rotated.  At 50 MHz the M&P has 0.6 dB loss and the LMR 600 has 0.5 dB loss per 100 feet.  That means the extra loss with the M&P cable in my installation would be less than 0.05 dB.  Also, the M&P cable claims to have 100% screening where the LMR 600 says >90%.

Therefore I ordered the 46-foot (14m) length of HYPERFLEX 13/.500" with a soldered N-Male connector installed (for the antenna end) and a 7/16" DIN Male for the end that will connect to the Heliax.  I also ordered a 3-foot piece with N-connectors on each end for an in-shack jumper.  Now here is where it gets amazing!

I paid via M&P's PayPal link at 0230 GMT on 21-May-2021.
The cables were delivered to my door at 1944 GMT on 26-May-2021.
Less than 6 days (including a weekend) from placing the order until receiving the product FROM ITALY!

That time included M&P constructing the cable to my specifications and shipping it to my door.  WOW!

When I unboxed the order, I found the 46m length of cable (with connectors installed) neatly coiled and wrapped in plastic (see photo at upper right - click on any photo to see a larger image.)  Also the 3-foot piece with N-connectors was in its own plastic bag and it included a Test Report where M&P had connected that particular cable to an analyzer and printed out a TEST REPORT for the Return Loss and Impedance of that piece of cable from 100 kHz to 200 MHz (see the image on the left.)  WOOF!  I am totally impressed and MORE than pleased.

I should also mention that the cables are secured with very nice Velcro straps with the M&P logo.  AND, a lens cleaning cloth is also enclosed.  You can see that cloth in the center of the upper right photo with the phrase "The DXers PRO Choice:" on it.  Yep!  You can bet that M&P is MY choice for cables in the future.

Wednesday, December 30, 2020

Sycamore Tree Removal

Damaged DE
I have a "forest" of trees directly East of my EME antennas.  In the winter when the leaves and sap are gone, it seems not to be a huge problem to my moonbounce operations, but in the spring and summer it provides a "brick wall" that keeps me from hearing all but the very strongest EME signals.   Two of these trees (directly behind the house) are Sycamores.  It turns out that Evelyn is severely affected by the dust these trees develop under their leaves in the summer.  If she steps out on the back porch, she will start exhibiting an allergic reaction in less than a minute!  Thus, these trees HAVE TO GO!

Once we decided to have these two Sycamores removed, we chose RealTree Tree Services (a local tree service) and they were able to schedule the removal for today.  I told them we just wanted to "drop" the trees over the lip of the hill where they sat.  Therefore they did not need to be cut up nor did we need the stumps ground down.  This kept the costs down.

These two trees were directly East of my EME array and provided significant blockage from 70° to 110° in Azimuth. This was the direction of my MoonRise and that's where I need to see the moon to be able to work stations in Europe. In the photo on the Top-Left you can see how close my antennas are to these trees even when the antennas are turned broadside to the trees.  And you get a bit of an ideal of how tall the trees are.  The tree cutters estimated the largest one was 65-feet tall.  The image on the Center-Right shows a better view to indicate the height of the trees.

Over the last 3 years I have been on EME, these trees have grown to the point where they prevent my antennas from pointing in their direction.  I first noticed this early in February of 2020 when my SWR suddenly shot up.  I tracked that problem down to the fact that the trees had reached out and GRABBED the driven element of one antenna and actually pulled it apart.  (See the image on the Top-Right of this Post.)  Click on any image to see it larger.

For multiple reasons I asked my Grandsons (Owen and Grant) to come down today to help out.  I knew they could clean the debris from the yard and could cut any of the trees that fell across the "trail" we used to access the HF tower.  They showed up about 8:15 a.m. and brought their friend, Logan, as well.  Evelyn had made a BIG breakfast for them with ham, eggs, biscuits, fried apples, hash browns, and hot chocolate.  After they ate (and the tree service had not arrived) I had them do a small amount of tree trimming at the mailbox.  Later I had them check our whole house generator and replace the battery in it.

When the tree service arrived, they saw that we had three strong men available so they cancelled their own ground crew.  The one guy that did all the major work then paid my "ground crew" $100 of what he had planned to charge me.  You can see on the Bottom-Left photo my Ground Crew cutting up the large tree.  It fell across the "trail" so they got to work with their chainsaws and cleared the way. Logan is on the left gathering up one of the ropes for the tree service guy.

Click HERE for a 30-second video of the trees coming down.  I was a little slow in starting the video for the large tree falling so it is not included.  That large tree definitely shook the ground when it hit.

There are still a LOT of trees to my East but I'm hoping that by removing these two large trees (which were so close to the antennas that the branches were touching the antenna elements) that my signals toward MoonRise will improve. Maybe it is wishful thinking but I feel like I can see more "sky" than I could before removing these two Sycamores. Time will tell. However, on Thursday morning I can tell there is a great deal more light coming into my bathroom. Those trees were definitely blocking a bunch of sky.

Monday, December 31, 2018

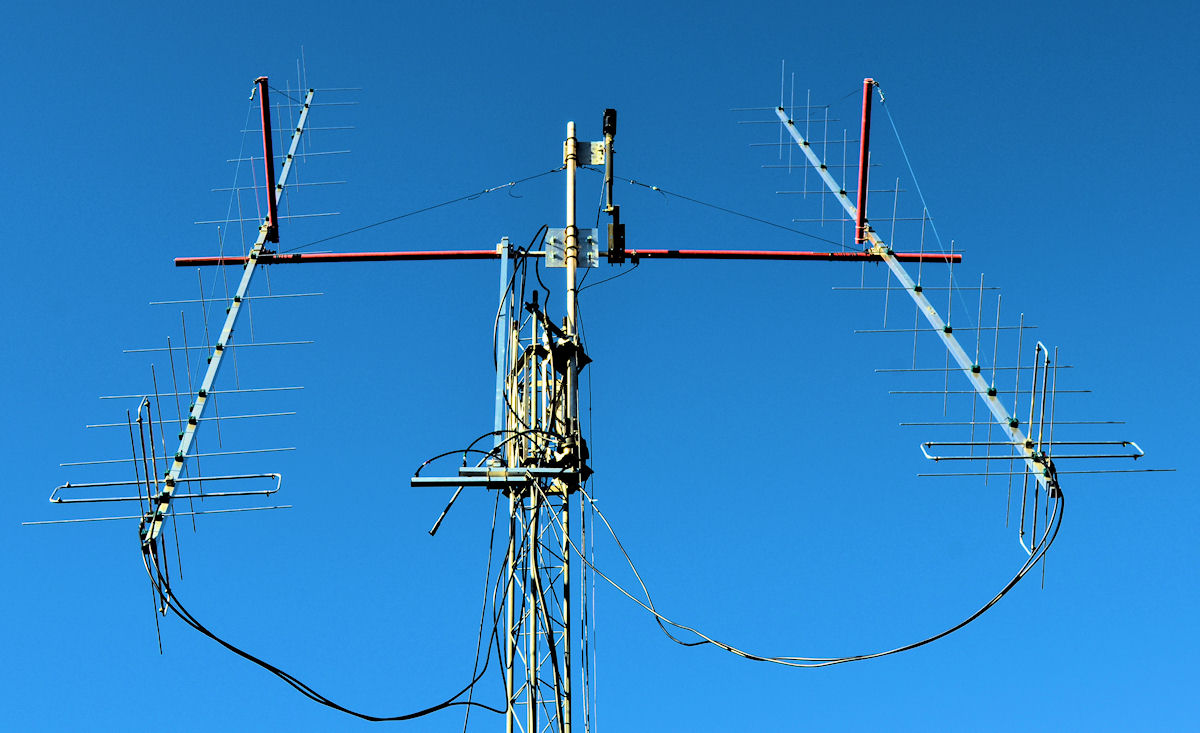
Moving the 2-M EME Antennas to Vertical Polarization

Horizontal Polarity for 13 Months
For the last 13 months I have operated 2-M EME with antennas that were fixed in horizontal polarization.  My two 13-element LFA InnovAntennas have been mounted "side-by-side" in a horizontal arrangement (see photo at left - click on any photo to see it larger.)  In an effort to see if I can expand the number of stations I have been able to work and maybe work a few New Ones, I decided to re-mount the antennas in Vertical Polarization.  Other EME stations I have talked with here in the U.S. tell me that they work more stations with Vertical Polarization than they do with Horizontal.  In that 13 months of operating with Horizontal Polarization, here are my 2-M EME totals as of November 26, 2018:

Antennas Are Down
   259 EME QSO's
   232 Initials (New Stations)
   185 Grids

   58 DXCC Countries Worked / 53 Confirmed

   U.S. States on 2-M
   44 Worked / 44 Confirmed
(not all via EME)

So, on 27-December-2018, with the help of my grandsons, Owen and Grant, we took down the two 13-element InnovAntenna yagis.  I then began the work of re-configuring the antennas so that they can be mounted in Vertical Polarization.

On 30-December-2018 the temperature was up to 49° F with a little sunshine so I proceeded with adapting the antennas for vertical mounting. This required removing and reinstalling the mounting bracket after rotating it 90°, doing the same for the truss mounting bracket, drilling two holes in each antenna for the truss cables to attach to the boom, and sealing the original holes in the boom.  I decided to locate the new holes for the truss wires 1-inch further away from the center of the antenna to not weaken the boom at that point.  Then, Scotch® Super 88 electrical tape was used to seal the old holes.

Cross Boom Mounting
Rotated for Vertical Mounting
Care was taken to make sure the truss cable was as far from the vertical elements as possible.  I achieved a spacing of 2-inches.  The truss cables are non-conductive but I wanted to avoid any close proximity to prevent transfer of rain/snow/ice and "critter" construction projects (spider webs.)  I also made sure that the antennas remained "in-phase" with each other (both antennas have the same side of the driven element in the same position.)  That is, the side of the driven element that is connected to the center conductor of the coax is pointing down on both antennas.  Both could have been pointing up but that's just how it worked out.  Care was also taken to make sure the mounting bracket for each antenna was positioned at the same point on both antennas. Finally, I drilled a 1/8-inch hole in the bottom rear corner of the driven element (which is constructed of tubing) to allow any condensation to drain out.

When the antennas were in horizontal polarization, the mounting brackets had the antennas sitting on top of the fiberglass cross boom.  I decided this time to allow the antennas to "hang" from the cross boom by the U-bolts when mounted in vertical polarization.  It may not make any difference but I thought it would make it easier for me to install the antennas with the nuts for the U-bolts now on the underside of the bracket.

The above work (including acquiring and replacing all tools) took four hours.  At this point all I need to do is to adjust the turnbuckles on the truss cables to bring the antenna boom into a horizontal position.  I also plan to construct two trusses for the cross boom in order to reduce the "droop" which has crept into the fiberglass cross boom.  That will be covered in my next Post.

Mounting Antenna
Adjusting Truss Turnbuckle
On Sunday morning, January 6, 2019, my grandsons, Owen and Grant, came to my QTH to help put up the antennas.  The temperature reached 50° and was partly sunny.  A very good January day.  First we mounted the antennas one at a time on a Workmate® "Portable Folding Work Support " in the vertical position.  Then, as you can see in the photo at the left, we adjusted the turnbuckles on the support truss so that the antennas were supported enough to keep the boom straight.  And added a Zip Tie to prevent the turnbuckles from loosening.

Once we had the first antenna complete, Owen and Grant installed it on the fiberglass Cross Boom.  In the photo at the right you can see them installing the second antenna on the Cross Boom.  We took care to make sure that the antennas remained "in-phase" with each other when we mounted the second antenna.

The difficult part was to tighten down the second antenna so that it remained parallel to the first antenna.  This took several tries until we all figured out how much we had to "over-compensate" when beginning to tighten the U-bolts.  Once we got that down, we quickly had the two antennas parallel.  The total time to do all of the work today was only 2 hours.  And, the thing I learned from when Tim, K8RRT, and I installed the antennas the first time in Horizontal polarization, was that having TWO people mounting the antenna makes it MUCH easier!  Also, using a small electric drill with the proper deep socket was a BIG improvement over just using a manual ratchet!

Once the antennas were installed, Owen adjusted the inclinometer so that it read the actual elevation (as measured by a digital level on the boom of one antenna.)  I was anxious at that point to raise the antennas to their final operating position until Grant pointed out that I had not connected the feedlines to the power divider!  DUH!  I'm sure glad these boys are understanding what we are doing so that they can keep old Grandpa straight!

Antennas are now Vertically Polarized
As you can see in the last photo, the left-hand antenna has just a little too much tension in the truss for the rear portion of the antenna.  When the grandsons are here later this week (when they are out of school), we will tweak that.  Also, I have completed the trusses for the fiberglass cross boom and maybe we can install them at that time.  That should (hopefully) eliminate the droop in the cross boom.

As I mentioned above, once I have installed the trusses for the cross boom, I will Post that info (with pictures) to this Blog.  Until then, I'm very anxious to try out the antennas in Vertical Polarization to see if I can work stations who I was not able to work when the antennas were Horizontally Polarized.  Moon conditions are not very favorable for the next two weeks but January 20-24 looks like some REALLY good moon conditions so you can bet I'll be in the operating seat whenever the moon is up on those days!

Saturday, October 7, 2017

Tuning the Antennas

On Friday morning, Charlie, N8RR, came and brought his SARK-110 Antenna Analyzer to my QTH to check out my 2-M antennas and tune them for best SWR. With the SARK hooked to his laptop we were able to make the adjustments to the driven element pretty easily.  We would pull the antenna array up with the Hazer until it was several feet in the air and rotate it until it was elevated at about 45°.  Checking it with the SARK told us where the SWR was for the lower part of the 2-M band.  Then we cranked down the Hazer and made an adjustment to the driven element before cranking it back up to check it with the SARK again.  It took about 3 tries to reach the lowest SWR.  Interestingly enough, there was no traditional "dip" just a very FLAT response curve.  We expanded the range of the SARK Analyzer to see what happened to the curve down in the 130 MHz range and that told us we needed to shorten the driven element to move the lowest SWR up into the ham band.  Once we got an acceptable match on the first antenna, we then adjusted the second antenna to the same dimensions as the first in just one operation.

The installation instructions for the antennas said to adjust the driven elements until the opposite sides of the driven element were 908mm apart.  After our tweaking, we ended up with the opposite sides being 878mm apart.  That was a total change of less than 1.2 inches (or just over 1/2 inch per side.)

Once we had both antennas tuned, we combined them with the 2-way power splitter and measured the SWR of the combined array to be 1.27:1 at 144.473 MHz.  At 144.200 it was just 1.28:1 and essentially FLAT across almost the lower 2.5 MHz of the 2-M band.  You can see the SARK's plot of the combined antennas below:


On the above plot the blue line represents the VSWR and the red line represents the Zs or absolute magnitude of the antenna's impedance.  As you can see, between 144 and 145 MHz, the VSWR is very close to 1.3:1 and the Zs (impedance) is right near 50 ohms for the ENTIRE range!  (The VSWR scale is on the left and the Zs scale is on the right. Click on the image to see it larger.)  For example, we set the cursor at 144.2 MHz and at that point the VSWR was 1.28:1 and the Zs was 49.6 ohms.  The Blue Triangle on the plot represents where the SARK found the minimum VSWR of 1.27:1 at 144.472.804 MHz.

At that point, we felt confident that the antenna array would play and called it a day.  Charlie had to get back home so we did not have time to calibrate the inclinometer nor do a couple of other small jobs that will need to be done later.  Still, this was a great step forward in the EME project. 
THANKS, CHARLIE!

Tuesday, October 3, 2017

WHEEE! The Antennas are Mounted and Aligned

WHAT A DAY!  My good friend Tim, K8RRT, came by today to give me a hand with mounting and aligning the antennas.  It's pretty certain that without his help, I would not have been able to do this on my own, even with Evelyn helping.  There is only so much I can do by myself at my age and having Tim give me a hand when I need it is priceless!  THANKS, TIM!!!

Yesterday was a day that did not go very well.  I spent a lot of time trying to find a drill bit or some way to drill a 7/8" hole in my PVC box for the LNA and T/R Relay.  The local electrical supplier had a Unibit that would have worked but they wanted $51.60 plus tax for it.  Too rich for me.  Finally I ordered one from Amazon that will be here tomorrow for $9.98 total.  But all the running around yesterday including getting blood drawn led to me forgetting to take my daily medications.  Coupled with a couple of short nights, I was pretty bummed out and "couch bound" for the afternoon/evening.  But, after a good night's sleep and taking my meds, I got up this morning in a much better mood and feeling like I could whip anything.

On Sunday I had gone to Lowe's and purchased a 1-3/8-inch diameter Poplar dowel rod.  I bought this because when I first attached the antennas to the Fiberglas boom, I was uneasy with tightening the bolts too far for fear of cracking the Fiberglas boom.  I bought the dowel to make a plug to fit inside the boom and provide strength for it.  Unfortunately, the dowel was just a tad too big to fit.  Therefore, my first job this morning was to clamp it in the WorkMate and run sandpaper over about a foot of the rod until I sanded off enough wood that it would fit.  It only took about an hour or so and four trips up the stepladder to check the fit.  Once I had the dowel sanded down to size, I cut two 6-inch pieces off the end and sanded them again.  At that point I gave them a light coat of Polyurethane as you can see in the photo on the left.  Throughout the morning, I gave another coat every 1-1/2 hours for a total of 3 coats.

When Tim and I had reached the point where we were about to align and tighten the antennas, Tim inserted the dowel plugs with a light coating of glue to make sure they stayed in place.  When he tightened the antenna-to-boom mounts, he said he felt very comfortable with the plugs in place and was really able to tighten the antennas to the boom.  NOTE:  After looking at the photo on the right, I decided to drill a drain hole in the lowest point of the Fiberglas cross-boom to allow any accumulated water to exit the tube.  This should prevent water build-up and subsequent freezing that could fracture the tube.

Tim and I also installed the rearward facing boom to support the LNA and T/R Relay Box as well as the 2-way power splitter.  We aligned it in the same plane as the antennas and put most of the hardware (LNA, T/R Relay, barrier strip, coaxes, etc.) onto the rearward facing boom to see how well the system was balanced.  Once we had all the materials in place, we engaged the Elevation rotor to pull the front of the antennas off the roof.  Everything held in place and the Elevation rotor was easily able to move the antennas up and down so we decided that the balance was close enough.

There was a good bit of "trial and error" in getting the antennas aligned and Tim was really patient with me (who wants everything PERFECT) and we did it again until the two antennas were "nearly" perfect.  "Good Enough for Government Work" was the standard we settled on - Hi!

Once the antennas and the rearward boom were aligned, we raised the Hazer cage high enough to be able to play with the rotors.  My external Rain Proof Hoist Crane Pendant shown at the right was just exactly what was needed.  Not running into the shack to turn a rotor!  SWEET!  At this point we calibrated the elevation rotor to the array by loosening the clamps on the Elevation rotor and running the rotor until it matched the measured angle of the array.  In practice I will be using an Inclinometer but I wanted to make sure the rotor was not near a "stop" that could cause operation of the rotor to cease at an unexpected point.  Click on any image for a larger view.

When we finished all the above work, Evelyn had prepared a scrumptious lunch of "Meat Lover's" Lasagna, tossed salad, broccoli with cheese, Brussels Sprouts, and Garlic Bread.  Then chocolate iced chocolate cupcakes for dessert.  YUMMMMM!  Just what a couple of tired Antenna Jockeys needed!  THANKS, DEAR!

We then took a 15 second video of the antennas in motion which you can see on YouTube at the link below:


The video shows the antennas moving DOWN and then CCW.  Note that at that point they are moving in both directions (Down & CCW) simultaneously.  If you pause the video just before it ends, you can see a square metal tube (the rearward boom) extending to the rear of the array between the antennas.  Near the end of this is the grey PVC box for the LNA and T/R Relay.  Beyond that is the Power Splitter to which each antenna connects.  The antennas will normally be much higher on the tower.  I just kept them low so that we can adjust the tuning of each of the antennas and so that I can wire the cables into the LNA/Relay box.

This was a BIG-TIME day on the 2-M EME project.  I'm getting so close I can almost taste the moon-rays!