Showing posts with label Tips & Techniques. Show all posts

Saturday, January 31, 2026

23cm EME Equipment - Block Diagram


Above is a block diagram of my 23cm EME station.  Click on it to see a larger image.  Note that the Leo Bodnar GPSDO injection board is actually installed inside the Icom IC-9700.  (See this Post - Leo Bodnar Installation)


All my 23cm EME Equipment "lives" on a 3-shelf rolling cart which stays in the garage along with my folding dish antenna.  When I plan to operate on EME, I simply roll out the cart, install the 2.4m folding dish, and connect the cables.  There are 3 cables from the Sub-Lunar SL-1 Az-El rotors to the WinTrak controller - the SEI controller Bus plus the Azimuth and Elevation power cables.

Then there are the two RF coaxes (Tx and Rx) which connect from the dish to the AG6EE power amp.  The Rx cable connects to the AG6EE preamp and the Tx cable to the OK1DFC Septum feed.  The TX cable connects thru the sensor of the WaveNode RF Power Meter and to the output of the AG6EE power amp.  The Rx cable connects to the AG6EE power amp which has sequenced DC voltage to feed the preamplifier through the coaxial cable.  The preamp also contains a built-in relay and dummy load and it connects directly to a septum or patch feed without the need for an adapter or coax jumper.

Once everything is connected, it is time to calibrate the dish's pointing location.  If the sun is not available, I can use the Theodolite app on the iPhone to get the Az and El of the moon and enter that into WinTrak.  If I have the sun, it is simpler to point the dish at the sun so that the square shadow of the Septum Feed appears on the exact center of the dish.  Then I press the calibrate button on the WinTrak software of the WinTrak controller and it will keep the dish pointed at the moon all the time.

You can see a 45-second video of me setting up the entire station on another Blog post "Setting Up the 23cm EME Station." There is a link in that Post to the video.  Clicking on that post will open in a new window. The setup of all the equipment actually took 19 minutes but the video was compressed to just show the basic operations.

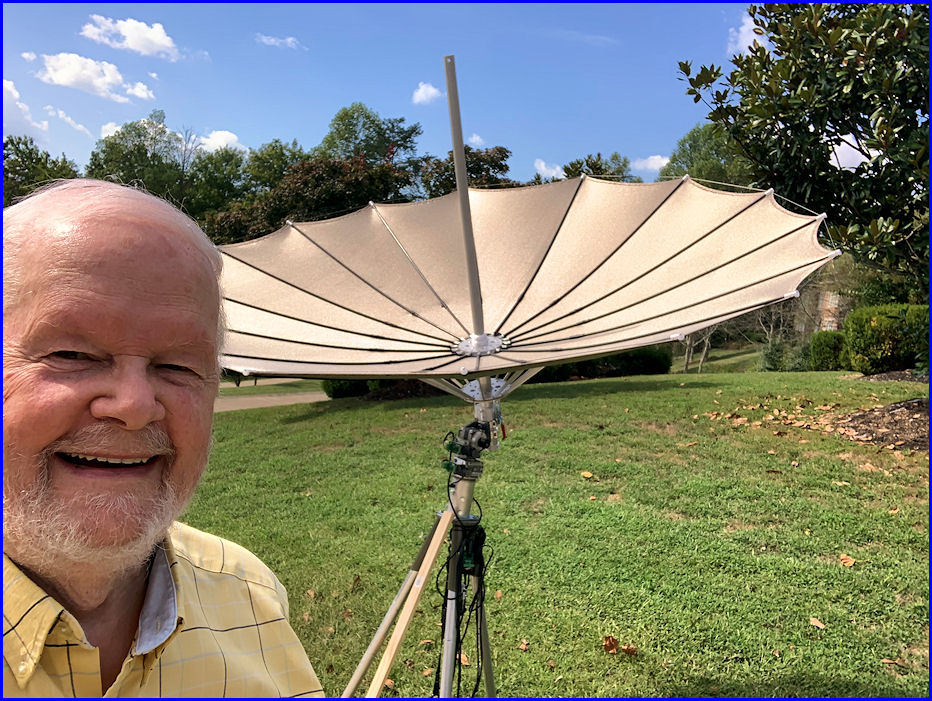
Below is an image showing how the sun's shadow appears on the center of the dish for calibrating the antenna.


Monday, October 6, 2025

New Feed Lines for 23cm EME


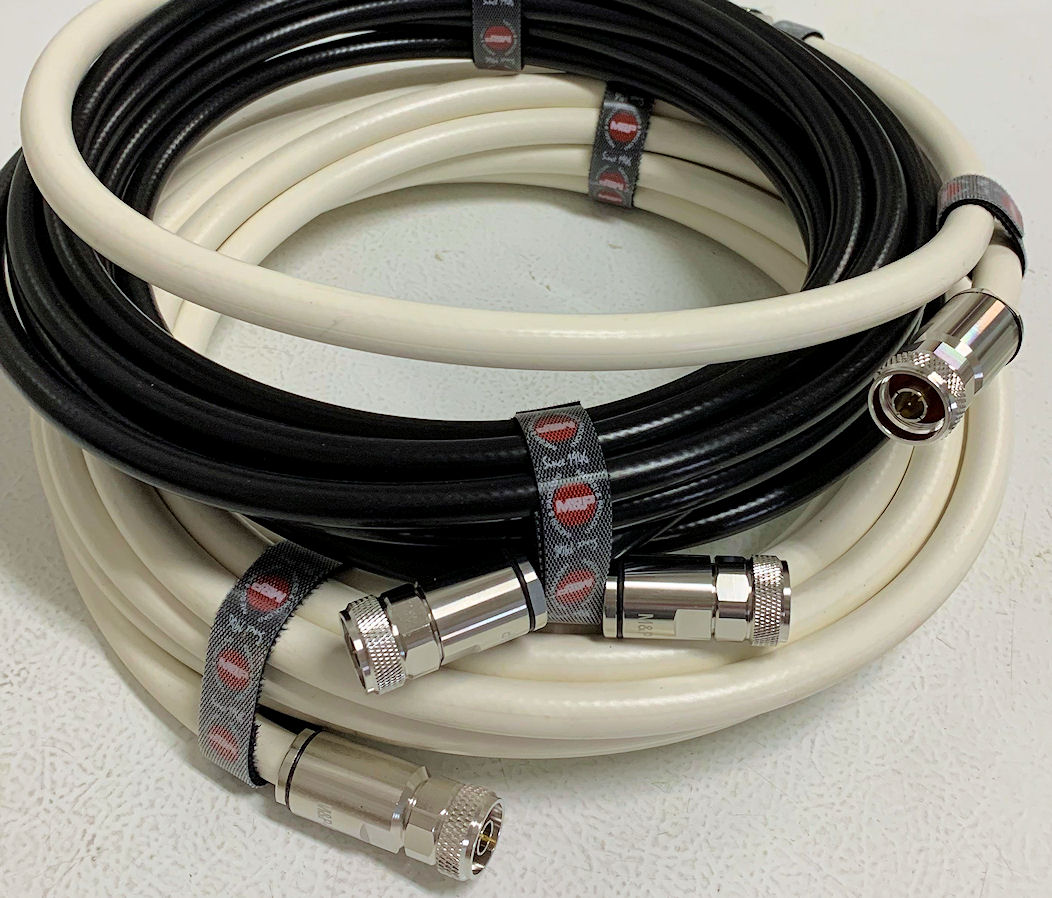
New feed lines were going to be required for my 23cm EME station.  For transmit I needed something that could handle as much as 700-watts on 23cm.  For several years I have depended on coaxial cable which is built in Italy by Messi & Paoloni.   They have been producing cables since 1984 and have received very good reviews.  I have made multiple purchases from M&P and have always been amazed at the quality of their cable and connectors.  For my transmit cables I decided on their HYPERFLEX 13 /.500" which is rated to handle 786 watts on 1296 MHz.  For my receive cable I chose their ULTRAFLEX 10 /.400" which is a little smaller and lighter.  I ordered a 6.5 m section of each cable with Solder type "N" connectors installed on BOTH ends.  I also ordered a 1.1 m piece of the larger cable as a jumper from the amp to the wattmeter.

The center conductor of the HYPERFLEX 13 contains 37 wires!  That makes it a very flexible cable. Click Here for a video showing how they install a soldered (or solderless) "N" Connector.  Their connectors are designed specifically for their cables.

I placed my order by email in the evening on September 29th, well after M&P had closed for the day.  In the morning of October 1st (1-1/2 days later) I had a response where they told me the HYPERFLEX cable with the black jacket was out of stock but they could supply their HYPERFLEX 13 Sahara with a white jacket.  Both cables have the same specifications but the Sahara cable has a white jacket to help reduce the attenuation degrading which a black cable can experience as the ambient temperature increases.  I quickly agreed to have the white jacketed cable substituted in my order for the HYPERFLEX 13 cables.  Just after midnight (my time) on October 2nd, I received the order confirmation and a PayPal link for me to make the payment.

Unbelievably the cables arrived at my QTH in the afternoon of October 6th.  Just 7 days after I placed the order!  WOOF!  Can you believe three custom-built coaxes with Soldered "N" connectors installed, were produced and DELIVERED from Italy in just 6 days?  Well, in my experience, this is NOT unusual!  My previous orders have taken only 6 or even 5 days to have connectors installed on custom lengths of cable and shipped from Italy to West Virginia.  

Click on the photo of the cables on the right for a larger view.  You can easily see the quality of the Soldered "N" connectors.  I continue to be very happy with the cables and connectors I purchase from M&P.  And I do not hesitate to recommend them.

Sunday, September 28, 2025

3D Printed Case for Amplifier Current Meter

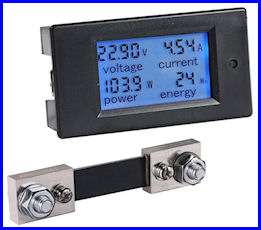
    In order to monitor the current being pulled by the AG6EE 23cm Amplifier, I purchased a Bayite DC 6.5-100V 0-100A LCD Display Digital Current Voltage Power Energy Meter Multi-meter Ammeter Voltmeter with 100A Current Shunt for $17.99 from Amazon.  That looked like a near perfect solution.  However, I did not want to just have that small (3.5"x2"x1") meter just lying around on the shelf or the top of the amp.  So, I searched for a box that I could mount that meter into and by chance came upon EXACTLY what I wanted as a 3D Print called "Power Monitor case V2" on Thingverse. Now the problem became "How Do I Print This?" since I do not own a 3D Printer.  Again, Mr. Google let me know that the Kanawha County Public Library has an area called the IDEA Lab where they will print 3D Digital Models and only charge for the filament used.  WOW!  
 
    I checked into the process and found I needed to take a Tutorial and a short Quiz, then sign a waiver to use this service.  That took only a short time and acquainted me with the 3D printing process.  I copied the necessary files from Thingverse to a USB Thumb Drive and took it and my completion certificate from the Tutorial plus the waiver to the library.  They said it should take 2 hours to print it and I could come back the next day to pick it up.  I did and they charged me $1.40 for the filament that was used.  Amazing!
 
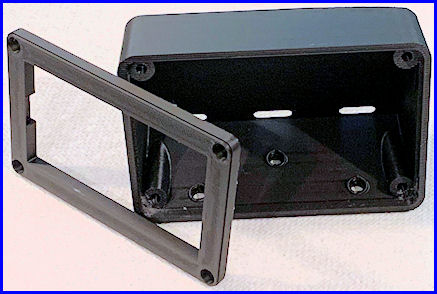
    The case was printed in 2 pieces (back and front cover) see image on the right of the completed 3D print (click on any image to see it larger).  Once I had it home, a half hour of trimming off any excess plastic gave me the parts I needed to mount the meter.  A trip to the hardware for some 3mm hardware to mount the front cover and I was in business. 

    Once I had the case cleaned up and the necessary mounting hardware, I needed to wire the meter shunt to the power supply and connect the the four wires from the Current Meter to the shunt and the positive terminal of the Mean Well power supply. 

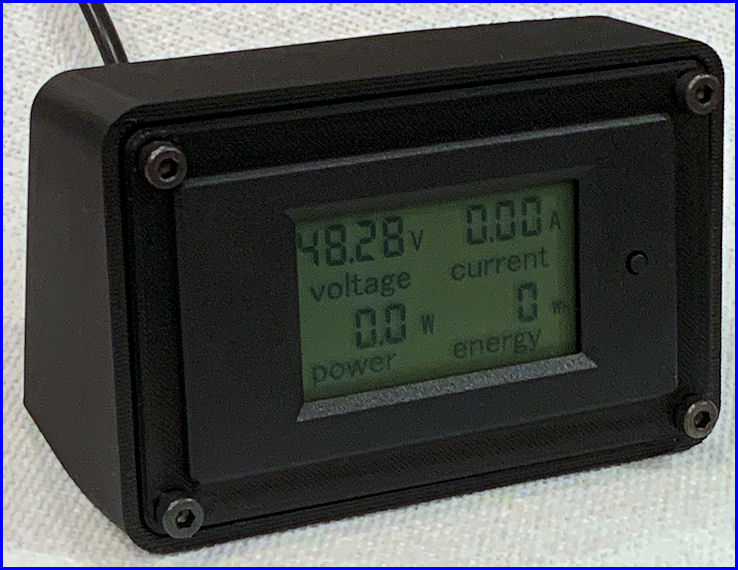
    As you can see in the final photo, the meter is now mounted in the 3D printed case and is ready to by used in my 23cm EME system to monitor the 48VDC power supply and the current being supplied to the AG6EE Power Amplifier.  The photo at the top of this page shows the meter with the backlight on but it was difficult for me to get a usable photo with the backlight on.

Saturday, September 6, 2025

Adding a Leo Bodnar GPSDO to the IC-9700

GPSDO Injection Board Installed

Since the Icom IC-9700 can experience significant frequency drift, especially on 23cm, and this drift can affect digital modes -- I decided to add a GPS Disciplined Oscillator (GPSDO) to the radio.  Leo Bodnar offers such a device which connects to the radio's "REF IN" connector and supplies an external 49.152 MHz signal (derived from GPS satellites) to lock the transceiver's internal frequency reference to a stable signal.  This will insure the radio will stay within 1 Hz on all bands.

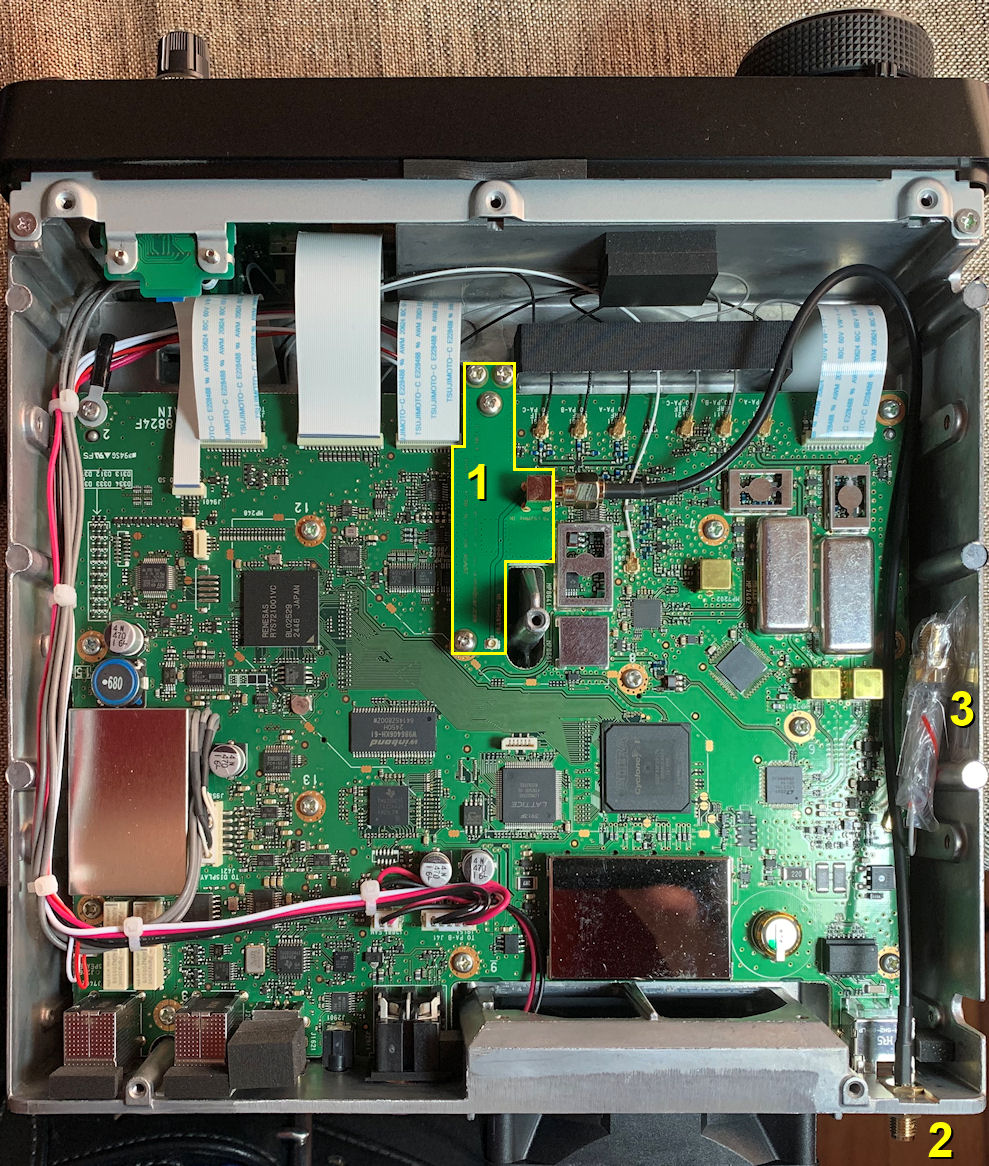
The product I purchased is the High Stability Kit for ICOM-9700 from Leo Bodnar.  This comes with the LBE-1420 GPSDO locked clock source which is a GPS receiver, an antenna for that receiver, an injection board for the IC-9700, and appropriate cables.  In the photo on the left (click for a larger image) you can see the injection board "1" installed (and outlined in yellow), the SMA connector for the GPS receiver "2" placed in the "REF IN 10MHz" location, and the original SMA connector "3" which was removed and taped to the inside of the radio.

The Leo Bodnar website has instructions for opening the radio and installing the injection board.  It is important to use the proper screwdriver, a Japanese Industrial Standard (JIS)  #2 and not a Phillips screwdriver to remove the 12 screws from the radio.  My only boo-boo was that I removed the 12 screws from the TOP of the case and not the BOTTOMDUH!  I wasted 15 minutes doing that.  Otherwise, it took me 1-1/2 hours to locate the tools needed, perform the install, and return the tools to the garage.  I was helped a bit by a video on YouTube describing the install and the setup of the device and the radio and also this YouTube video.

I did not have a frequency generator to produce a tone for fine tuning of the "REF Adjust" menu item in the IC-9700.  I did find a birdie and made some minor adjustments using that.  However, once I can source a relatively accurate signal source, I will do that part of the setup again.

This part of my 23cm EME project was pretty simple and took very little time.  Hopefully this will insure that my radio is on frequency and not drift.  This should allow me to make a few more EME contacts or make them more quickly. 

Thursday, August 7, 2025

Theodolite Application for Locating the Moon

Theodolite is a multi-functional app that combines a compass, inclinometer, rangefinder, GPS, map, and camera with geo-overlay for augmented reality. It's essentially a digital theodolite, allowing users to measure angles, distances, and positions using their smartphone or tablet.  This is the perfect way to locate the moon in azimuth and elevation for pointing the antenna.  I purchased this app from the Apple Store for $9.53 and in my opinion it is well worth that price.

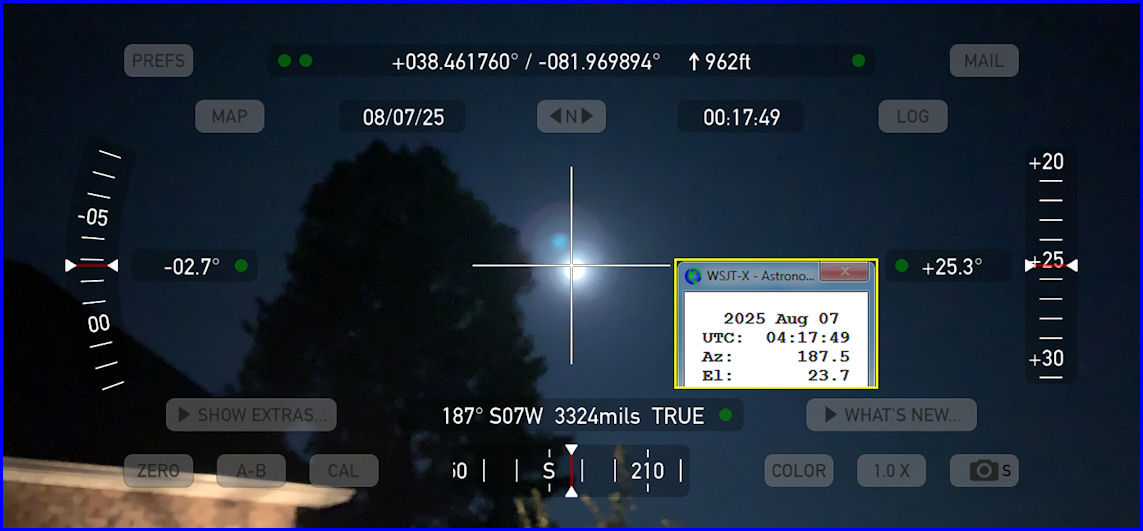
Below is my first attempt at using this app to locate the moon.  Local time was just after midnight and Full Moon is in 2 days so this moon was over 90% illuminated - it is bright!  You can see a tree to the left of the moon and also a portion of the edge of my garage.  This image was taken at the point where I plan to set up my Sub-Lunar Folding Dish.  At the time I took this photo the declination was -27° so the moon was not very high in the sky even though it was nearly due South of me.  You can see that the Horizon Angle on the left shows the phone was tilted 2.7° away from horizontal.  (Click on any image to see a larger version.)

I placed inside the Theodolite image a Yellow bordered box showing the Astronomical Data from WSJT-X for the same date/time.  You can see the app shows an Azimuth of 187° and WSJT-X shows 187.5° and since the moon is actually below the crosshairs, the indicated Elevation Angle on the right (of +25.3°) was a little off from the WSJT-X number of 23.7°  At the top of the screen the app also shows my latitude/longitude and elevation. 

I learned that I might want to set my iPhone on a tripod to keep it steady in the future.  Just holding the phone in my hands it was difficult to center the moon in the app.  Also, you can push the "Zero" button in the bottom left and it will put a box around the crosshairs in the center of the image.  This box changes color from Red to Yellow to Green then White as you get the image lined up with the horizon so the elevation numbers are correct.  What this button does is to zero all angles at a given orientation of the device, thereby showing angles relative to that reference until you tap the button again.  Once you tap zero again the true angles will be displayed and if the phone has not moved, the Elevation Angle will be correct (as long as the moon is centered in the crosshairs!) 

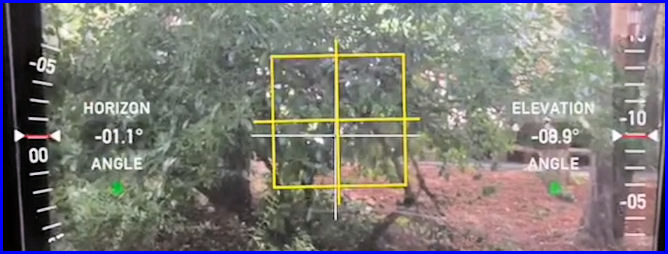
In the example below the Elevation Angle on the right shows -08.9° but the Horizon Angle on the left shows the image is -01.1° from being level.  And, the yellow box shows you are close to being lined up.  If you line up the image and "then" press the Zero button, it will adapt the image so that the Horizon angle is 0.0°


I don't think this app will take much effort to be able to dial in the location of the moon.  Once I have those numbers, I can set up my SL-1 Az-El Positioner to the current moon location and "hopefully" it will then track the moon automatically.  If I don't have visible moon, I "think" I can still use this app to align it with the dish feed and use that as the starting position for the Az-El Positioner.  The Theodolite User Manual is located HERE.

New EME Challenge - 23cm

In the late 1980's I had four CushCraft A32-19 yagis and a kW for my first ever EME activities on 2-M.  I managed to make 5 QSO's (CW) including K1FO and WA1JXN/7 (Now W7GJ!) before the antennas fell.

From 1992 to 1995 I operated 70cm EME beginning with my first ever 70cm EME QSO - DL9KR on 18-October-1992.  This was before WSJT or JT65 were invented so almost all QSO's were CW except for one on SSB with VE3ONT who was operating a 150-foot dish antenna!  I used four K1FO 25-element yagis and a kW and I made at least 74 "Initials" on 70cm EME.

In November 2017 I installed two 13-L InnovAntenna yagis for 2-M and with a kW from a W6PQL amplifier, over the next 6 years I completed 345 EME QSO's with 278 "Initials" and 64 DXCC Entities.  That station is now temporarily QRT due to a failure in the elevation mechanism.

In 2022 and 2023 I was able to make a couple of EME QSO's with KJ9I on 6-M.  I was using an 8-L InnovAntenna LFA2 yagi at 28m AGL with up to 1.5kW.  But, although Lance, W7GJ, heard me on 3 of his DX'peditions, I was never able to hear him.

Now, after having completed EME QSO's on 6-M, 2-M, and 70cm, I felt it was time to explore a new EME band - 23cm (also known as 1296 MHz.)  Over the past few years there have been huge improvements in equipment for this band and it is possible to purchase all needed items off-the-shelf without the need to "home-brew" any of the needed equipment.  I had delayed moving to this band for several years because my location was not suitable for a parabolic dish antenna (mounted on the ground) to see the moon in the part of the sky which favors Europe.  Too many trees!  However, Paul Andrews, W2HRO, has developed and is marketing a lightweight, folding parabolic dish which uses space-age RF reflective fabric.  His company, Sub-Lunar, sells folding dishes in several sizes, patch feeds, OK1DFC Septum feeds, WinTrack Software/Hardware from N8CQ, Az-El positioners, and many other products to support EME operation.  This "portable" dish concept allowed me to consider other locations on my lot where I could "temporarily" install the antenna with a better view of the moon.

I decided to go with a 1.8m dish (just under 6-feet in diameter) because it was lighter and easier to install and remove.  The 2.4m dish would add about 2 dB to TX and RX signals but I was concerned that I might not be able to handle that larger antenna by myself.  The antenna folds and unfolds like an umbrella!  But it is not weather proof in any of its components and is sensitive to wet and wind!  For that reason, it is a "temporary" antenna.  I plan to only use it when the weather and moon conditions are favorable. UPDATE 2025-08-20 - After talking to several EME'ers and checking with W2HRO at Sub-Lunar, I opted to change my folding dish order to a 2.4m version.  Paul (W2HRO) said he felt I would have no problems with the larger dish.  The earlier models were a little tight but no more.  Bigger is better they say!  -  As it turned out, I was able to install the 2.4m dish just fine!

Considering this would be a "temporary" set-up, I decided to purchase a rolling cart that could hold all the equipment (power supplies, amplifier, laptop, etc.) and thus it would be extremely simple to just roll the cart out of the garage, erect the antenna, connect the feedlines, and be on the air.

A recent improvement in folding dish setups is the OK1DFC Lightweight Septum Feed.  Originally those stations with a folding dish used a "Patch Feed."  But on 23cm (1296 MHz) EME signals use circular polarization.  In order to get circular polarization from a patch feed, you need to incorporate a 90° hybrid to provide circular polarization. However, to switch between LHCP (Left-Hand Circular Polarization) and RHCP (Right-Hand Circular Polarization), a power relay and a set of cables are also required.  A key advantage of the septum feed is its ability to generate both RHCP and LHCP simultaneously!  This eliminates the need for a 90° hybrid.  Also many hybrids are not exactly 90° so that results is less than optimal operation.  And, 90° hybrids are limited in the amount of power they can handle - often only in the 200-watt range. 

Other major components include a preamplifier and a high power amplifier.  Thankfully AG6EE has been building both.  His pre-amp has about 30 dB of gain, with a built-in relay and dummy load - and can connect directly to septum feed without a jumper.  His 23cm amplifier is spec'd for 600W out (max 700W) and splits the input into TX and RX lines, the RX line has sequenced DC voltage to feed the preamplifier through the coaxial cable. 

Since I have not operated on 23cm for 24 years (and all that equipment is gone) I needed to acquire a transceiver to operate on 23cm.  I chose the Icom IC-9700.  There is a know frequency drift problem with that radio on 23cm so I ordered a GPSDO from Leo Bodnar to incorporate inside the IC-9700 with an external GPS antenna included. In order to install the Leo Bodnar injection board inside the IC-9700, it is necessary to open the case of the radio.  That requires a special screwdriver. A P2x100 #2 JIS Cross Point Impact Screwdriver is what I ordered from Amazon. And, a laptop would also be required so I purchased a refurbished Dell 5500 Win10 from Amazon utilizing an 8th Generation Intel Core i7 with a 512GB SSD Hard Drive and 32GB DDR4 RAM.  To power the radio and the pre-amp I bought a PowerWerx 30A 14.1 VDC Power Supply, and to power the amplifier, I purchased a Mean Well RSP-2000-48 VDC Power Supply from DigiKey.

Several other minor items were also purchased - a 23cm Coaxial Dynamics 1kW element for my Bird 43 wattmeter, a WaveNode® WN-2m digital wattmeter with 500-watt 23cm sensor, 6.5m feed lines from Messi & Paoloni in Italy, a 50-foot 12/3 extension cord, an AC power strip, a spiral ground anchor to hold the dish tripod down, an LED keyboard lamp, a Shielded/Filtered USB Cable for the IC-9700, and so on.  Then a fair amount of time was spent downloading and installing multiple pieces of software on the computer.  I worked on this project every day with the goal of being operational on 23cm EME in time for the ARRL EME Contest on October 11/12.  Fingers crossed! = SUCCESS!  I am now operational on 23cm EME!!!!!!!

Sunday, November 19, 2023

QSL'ing Tips & Tricks - Hint #4 - Bypassing Postal Thieves

 A series of "Tips and Tricks" for obtaining a QSL when normal means fail.

If you need to acquire a QSL from a DX station via the postal service, this method can have its own risks.  Mail delivery in foreign countries is not always the best of services and those who handle the mail are not always the most trustworthy.

Your envelope could just never get delivered - go missing in transit - or the contents of your envelope may not arrive.  Some nefarious person can "tamper" with your envelope and
     A.  Remove the money you included
     B.  Remove the SAE you included.
     C.  Or, just "take" the entire envelope for themselves.

It seems that when a foreign ham gets a lot of mail from overseas, the "bad guys" in the postal system will begin to recognize that these mailings many times contain U.S. dollars.  Thus they actively look for those envelopes and take the contents (or the entire envelope) for themselves.  Being aware of this you can take steps to "disguise" your envelope and prevent pilferage.

Never put callsigns on the envelope.  This is a dead giveaway!  Personally I like to print my envelopes so the text can be as clear as possible to the machines and people who sort the mail along the way.  I also like to capitalize the name of the country to make it stand out.  (You can click on any image here to see it in a larger size.)


For my SAE (Return Envelope) I like to spell out my country AND put in the normal abbreviation for it:


VERY IMPORTANT:  Never allow your dollars to be seen through the envelope even if it is held up to a strong light.  I like to fold my dollars in half and insert one end of them in the Return Envelope and then slide my QSL up under the Return Envelope flap over the dollars to further conceal the money.  I also press the folds down well to make the envelope as thin as possible.  HINT:  Use the nicest bills you can find.  Torn, dirty, or even heavily wrinkled bills can not be exchanged in some countries.  I have even purchased 100 Brand New bills from my bank for this purpose. 


However, all those tricks may just not be enough.  If you find a DX station who posts that his mail is being stolen or that envelopes arrive without money, there is another step that has been proven to work several times.  Make the envelope look like it is a business communication which contains a "bill" and not money.  I created a fake invoice in Microsoft Word with the word "INVOICE" large and Bold so that it would show through the envelope.  I inserted it in a business size envelope from my defunct business to make it appear even more real.  In every instance where I have used this trick - it has worked.  The money and QSL's arrived at the DX station and I received my return QSL from him.


If even the "Fake Invoice" trick fails, you can still ask the DX station for a PayPal address where you can send him the money to pay for him sending you a QSL.  LoTW has helped immensely to remove the problems of getting paper QSL's by mail but sometimes this is what you need to do in order to obtain that elusive confirmation!

Monday, October 23, 2023

QSL'ing Tips & Tricks - Hint #3 - QSL Cards

 A series of "Tips and Tricks" for obtaining a QSL when normal means fail.

Why would anyone even go to the trouble of getting a QSL card from any DX station they work?  One of the main reasons is that a confirmation of a QSO is essential to many awards.  Logbook of the World (LoTW) has made a major impact on confirmation of contacts but not every station uploads their logs to LoTW.  That leaves a "written" confirmation (QSL card) as the method needed to apply that contact toward many awards.  And, collecting QSL's from rare DX stations is FUN!  Looking back through a stack of attractive and informative QSL's allows you to remember those contacts and educates you, your family and friends about the interesting places around the world which you have contacted.

You can view many different QSL's from all 340 Current DXCC entities from 1920 to the present on the K8CX QSL Museum.  In addition to QSL's, the K8CX Museum contains Sound Clips, Photos from the Dayton Hamvention, Tributes to Ham Operators, and several other interesting items.  Check out the Table of Contents for all that info.

An important first step in filling out your own QSL is to make certain the DATE is understandable to anyone in any country around the world.  If you put the date down as "10/12/2023" does that mean October 12 or December 10?  American usage calls for a month/day/year date format, the United Kingdom and much of Europe use a day/month/year format, and most countries in Asia use the year/month/day format.  Confusion!  Putting the date in the wrong format can result in the dreaded "Not in Log" result.  Make sure you either spell out the Month or create columns on your QSL that leave no doubt as to the date of the QSO:

It should go without saying that you need to write out your QSL information in a legible manner.  Always think that your QSL is being viewed by someone for whom English is NOT their primary language.  PRINT everything as clearly as possible.  Better yet, use your Logging program to either print the QSO information directly onto the QSL Card or onto an adhesive label.  This is not difficult to do and provides the clearest way to put all the necessary information onto your QSL.  (The pre-printed information on my QSL in the image below has been grayed out to better show the QSO information I printed onto the blank QSL with my own computer & printer.  Click on any image to see it larger.)


Where to have your QSL's printed?  There are dozens of printers who will print QSL cards for you and you can even print them yourself.  (See my Hint #1 Post HERE for a way to print your own.)  For several years I have been using UX5UO Print to print my QSL's.  Gennady is located in the Ukraine and appears to still be in business even with the current Russian war.  As of October 2023, 21,972 unique callsigns from 320 DXCC countries have already been printed by "UX5UO print".  You can get 1,000 Luxury cards printed with Full Color on the front and single color on the back for less than $85 including shipping!  Below are my current QSL's which were printed by UX5UO from photos I provided.  You can see the rear of one of the QSL's above - the grayed out area.


You do not need fancy QSL's but you do need at least a basic one to be able to send for the QSL's you want to collect.  I have worked four New Ones on 6-M in the last 3 days and TWO of them are NOT on LoTW!  Therefore, I need to send my QSL to them or request their card via OQSL (more on that method later.)

Wednesday, October 18, 2023

QSL'ing Tips & Tricks - Hint #2 - Using Email

A series of "Tips and Tricks" for obtaining a QSL when normal means fail.

Often you "think" you had a good QSO but it never shows up on LoTW or on the Online Log for the station you think you worked.  If it is for a New One (on a particular Band or Mode) or even an All-Time New One (ATNO) then working a bit to secure a confirmation for that contact is warranted.

If it is a DX'pedition, you really need to immediately try to work the DX on that same Band or Mode for an "Insurance Contact."  That way if your initial QSO can not be confirmed, you have a 2nd chance with the insurance contact.

A good first step to acquiring the confirmation is to send an email to the station you worked - or to the QSL Manager.  You can usually find the email address on QRZ.com under the callsign of the DX station you worked.  Or, if the DX has a Manager, look at the Manager's QRZ.com address for his email.

ALWAYS be polite in your email.  Never make statements like "You busted my call!" or "Why did you not put me in your log?"  Being polite always pays off.

Make the subject line descriptive of what you want.  Something like "4L4DX QSL Question from W8TN" will tell the DX or the Manager what you are seeking.

In the body of your email, keep it "short and sweet."  Describe why you think you had a valid QSO for which you are seeking a QSL.  For a WSJT-X contact, you might include something like this:

I have a question about a QSO I believe I completed with 4L4DX on 17-M FT8 back on May 30, 2023.  I am writing because this QSO does not show in Club Log.

Below are all the pertinent items I have in my ALL.TXT file:

230530_031930    18.100 Tx FT8      0  0.0  506 4L4DX W8TN EM98
230530_031945    18.100 Rx FT8      1  0.2 2012 W8TN 4L4DX -17
230530_032000    18.100 Tx FT8      0  0.0  506 4L4DX W8TN R+01
230530_032115    18.100 Rx FT8     -9  0.2 2012 W8TN 4L4DX RRR
If it was an SSB/CW/RTTY QSO, you could say something like this:
Dear Mr. Jones,

I sent my QSL with $2 U.S. and a self-addressed envelope to the following address on 05/05/2014 (05-May-2014):

Esmond Jones
P.O. Box 10868
Georgetown
GUYANA
SOUTH AMERICA


As of 02/11/2015 (02-November-2015) I have not received a QSL from 8R1AK.  Did my envelope/QSL/$$ get lost in the mail?  Do I need to send again?

QSO info:
W8TN
05-March-2014 (05/03/2014)
2209 GMT
12-M (24.950 MHz)
SSB

This is my only 8R QSO on 12-M.  Thank you for your consideration.
Finally, keep track of these emails you send.  Make a note in your log as to when you sent an email or make a "Label" or "Folder" in your SENT email folder for "QSL Questions" and put these emails there.  That makes it easy to look back and note if you have not received a response after a reasonable time.  This will allow you to follow up with another email or try to contact someone else.

For reference, both the above examples were successful.  The QSL Manager agreed that I had a valid QSO and saw to it that my QSO with 4L4DX was placed in the online log.  And for 8R1AK, I did receive the paper QSL a few months after sending this email.

Update WSJT-X to the Latest CTY.dat File

 The following quote is from: https://norfolkcoastamateurs.co.uk/cty-dat-country-files/

Have you ever wondered how all of the various types of amateur radio software, e.g. N1MM and DX Cluster nodes, keep up to date with the plethora of changes that occur to a simple list of countries and prefixes? These changes take place almost daily and getting it right can be vital for contest point scoring and award tracking so you need to log the correct information.

Which DXCC entity is GB4CTY located in this week? It could be any of England, Scotland, Wales, Northern Island, Guernsey or Jersey.

What about G3YPP/NHS. Surely the /N places him stateside.

It would be a remarkable feat if every single program was updated individually by their development teams every time a prefix or entity changed or a new Special Event Station was activated.

Fortunately, most logger and contest software makes use of cty.dat files which have been kept updated by Jim Reisert, AD1C as a labour of love for many, many years. Known as country files, full details can be seen on Jim’s website here: Country Files

This is from: https://www.country-files.com/contest/wsjt-x/

The WSJT-X User Guide states, “WSJT-X includes a built-in cty.dat file containing DXCC prefix information. Updated files can be downloaded from the Amateur Radio Country Files website when required. If an updated cty.dat is present in the logs folder and readable, it will be used in preference to the built-in one.”

Starting with Version 2.7, you can update the country file from within the program. In Settings, click on the Colors tab and you’ll find the information at the bottom of the window.

WSJT-X pull down File | Settings... | Colors tab

This update process simply can not be any more painless.  Doing this assures that your WSJT-X decodes are identified as the correct country.  And, if you use supplemental programs like JTAlert or GridTracker, they can give you audible or text/email alerts for those decodes you need.

Monday, October 16, 2023

QSL'ing Tips & Tricks - Hint #1 - Blank QSL

A series of "Tips and Tricks" for obtaining a QSL when normal means fail.  

Recently a friend told me he was trying to obtain a QSL for a contact that was several years old.  He had sent his QSL + SASE to the QSL Manager but the manager replied with a note saying he recently had downsized, moved, and no longer had any blank QSL's.  The manager DID state he had uploaded the logs of the DX station to the QRZ Logbook and my friend's contact WAS listed there.  However, since he had no blank QSL cards, he was unable to confirm the contact.

My method of solving such a problem is to send some BLANK QSL cards to the QSL Manager.  I learned this trick from Steve, KØCS, (now a SK) several decades ago.  YI1BGD in Iraq came on the air in the late 1970's and Steve worked them for an ATNO but could not get a QSL.  So, he had 100 QSL cards professionally printed and he airmailed them to Iraq.  He then sent his QSL + SAE +$5 EVERY MONTH for a year until he got it confirmed.  Unfortunately it was not with one of the QSL's he had printed!  Still, I learned from that trick and have used it on a few occasions to secure a QSL for a needed State or Grid. 

To help my friend get the QSL he needed I found a website where you can quickly design a Blank QSL.  The site will produce a PDF file which you can use to print on your own printer or at a local print shop.  Then you just send the Blank QSL's to the QSL Manager and ask him to fill one out.  Here is the website I used: QSL Card Creator. You can make just a very simple, basic QSL or get creative by adding graphics.  Below is the Blank QSL I created for my friend.  It took about 5 minutes to do this.

I gave my friend 6 of these Blank QSL's (which I printed on some card stock) to send to the QSL Manager.  I will post back here his results.

BONUS HINT: You can use this method to print Blank QSL's for yourself to confirm contacts you may have made while portable - like Field Day or POTA.

/\/\/\/\/\/\/\/\/\/\/\/\/\/\/\/\/\/\/\/\/\/\/\/\/\/\/\/\/\/\/\/\/\/\/\

The A35TR QSL Manager DID respond by filling out one of the blank QSL's and he returned it to my friend.  The Blank QSL preparation was well worth the minimum effort it took in order to receive a confirmation for a New One which had seemed impossible to get confirmed in a normal manner.

Tuesday, September 5, 2023

Configure JTAlert to Send Text Msg or Email User Alerts

JTAlert has the ability to alert the user (you) by playing an audible message for Wanted States, New DXCC, New Zone, New Grid, or several other decodes you want to be notified about when it decodes a callsign matching one of your "Needs."  This feature has garnered me several New Ones on 6-M (both DXCC's and Grids) by playing an audio message of "Wanted Call," "New Country," "New State," "New Grid," or any of a dozen or so other alerts.  This feature is wonderful as long as you are close enough to your computer to hear that audible alert from your computer's speakers. 

But what about when you are too far away to hear that alert?  To solve that problem Bill, WTØDX, has written a procedure to allow JTAlert to send a Text Message and/or an Email in addition to that audible alert using JTAlert's User Alert feature.  Zowie!  I would say this procedure is the "Bee's Knees" but you have to be "of a certain age" to understand that phrase!  Maybe I should call it "Lit", or "Dope" or "Fire" to be more current in my slang.  In any event, I think this is Absolutely AWESOME!

I  was lucky to be a "Beta Tester" for this procedure.  My findings were that "Anyone with a rudimentary knowledge of creating folders and working with text files should be able to follow this procedure with no problems." It took me exactly 1 hour to complete the procedure AND record 2 pages of notes at the same time.  I did already have a Gmail account with 2-Step Verification enabled so that gave me a bit of a head start.

The procedure is contained in a 19-page PDF file.  It is that long because it has a LOT of screenshots to make each step easy to follow.  An overview of the procedure is:

- Create Gmail email account (optional if you already have a Gmail account you want to use)
- Enable 2-Step Verification for the account
- Generate an Application Password for that account
- Edit the Send Alert file and save as a batch file
- Download CMail application
- Store Send Alert batch file and CMail application in a folder
- Configure JTAlert
- Test

You can download the PDF file plus two text files (Send Alert.txt and CMail test.txt) which are described in the procedure, as a ZIP file from this link:  JTAlert User Alert Files.  UnZIP that file then follow the procedure in the PDF file.

Below are screenshots of an email and a text message created by this procedure.  I had left my radio receiving on 17-M and JTAlert decoded 4L7T which would be a New One for me.  It then sent me the email and text messages shown below.  (I missed working 4L7T because I was on the mower and did not hear my phone ding!)

4L7T Email + Text Message

The latest version of JTAlert is 2.60.10 available HERE.  My version is 2.60.5 (Build date: 7-Feburary-2023) and this procedure worked just fine with my older version.

Combine the above procedure to alert you to needed callsigns which your own station copies with the HamAlert feature which will send you a text message when a needed entity is spotted on the Cluster or reported to PSKReporter, and you have covered all the bases.  Here is a Post detailing the HamAlert notification feature: DX Spots that "Only YOU Need on Your Phone.

UPDATE RE Verizon Wireless:

For those of you with Verizon Wireless, please read the following article regarding a new "feature" to disable email to text messages. 

If you have turned off email to text "spam" messages, then you will not receive the alerts.  (Thanks to Jim KC4HW for pointing this out).

https://www.cnbc.com/2023/08/29/verizon-has-a-new-way-for-customers-block-email-to-text-spam-messages.html

--
73 Bill WT0DX

Monday, January 23, 2023

DX Spots that "Only YOU Need" on Your Phone

Chasing DX on 6-M is always challenging.  The propagation is not very predictable and stations can appear only for moments before disappearing - never to be heard again.  I have long searched for a way to be notified when there was an opening that "might" allow me to add a new country to my totals.  Early on my push was to just reach the 100 entity level for 6-M DXCC.  My quest took 37 years and 10 months on the band before DXCC was achieved.  Still, mine was the first 6-M DXCC in West Virginia and only the 739th award issued worldwide.  During a lot of my pursuit there were very few countries who authorized operation on 50 MHz.  And, most major manufacturers did not include that band in their radios. (Plus, FT8 did not exist!)

Very early on there was a net on 28.885 MHz which alerted folks to openings around the country.  In 1989 it alerted me to an opening for KG6DX on Guam.  That opening lasted less than 90 seconds for me but gave me a New Country. Sometime in the late 1990's, I joined with several of my 6-M DX'ing friends all over the country, and created a telephone alerting network to let others know when an opening was happening.  I kept and distributed a list of calls, names, phone numbers, XYL's name (in case she answered the phone), and a listing of the prefixes that person Did NOT Need.  Below is a snippet of a later copy of this list (click on any image to see it larger):

One tool I also used was to put a "Baby Monitor" at the radio, let the radio scan the lower part of the band, and take the monitor with me when I was out of the shack.   In later years I set up Logger32 to send a text message to my phone when Telnet posted a spot for a New One for me.

Most recently I have been using JTAlert to announce NEW COUNTRY or NEW GRID over the computer speakers when my station copied a New One.  This has been very helpful and alerted me to the fact that I was copying China while I was on the back porch grilling burgers!

But if I depend on only being alerted when my station actually copies a New One, I may not make it to the radio in time to score a QSO because the openings are so short.  Over the years I have missed many New Ones because I did not have the radio turned on, I was at the store or otherwise unaware of an opening, or multiple other reasons.  In reality you can not sit at the radio all day waiting for the propagation gods to favor your location.  But, as we know, (per K4OM) the way to succeed on 6-M (or most bands) takes your "Butt in the Chair!"

The trick is an "Early Warning" system.  Something that would tell me that a country I need is being heard or spotted "somewhere near me."  Call it my 6-M DEW Line.  I think I may have found that!  It is HamAlert which is a is system that allows you to get notifications when a desired station appears on the DX cluster, the Reverse Beacon Network, SOTAwatch, POTA, or PSK Reporter. You only need to sign up for a HamAlert account (free), load the HamAlert app on your phone, and enter "Triggers" to tell the system when you want to receive an alert. AWESOME!  As you can see below, HamAlert processed over 13 MILLION spots and sent over 218 THOUSAND Alerts just TODAY!

You can set up the parameters (Triggers, Limits, Destinations, etc.) on the online HamAlert page.  Under "Destinations" I chose the HamAlert app on my iPhone as where the alerts would be sent and chose "Morse" for the sound.  I made no changes from the defaults on the "Limits" page.  On the "Triggers" page, I set up a Trigger for 6m and attempted to load my Club Log records into the "DXCC" condition.  Unfortunately after the upload, HamAlert only had 104 entities for me on 6-M instead of the 143 it should have had.  So, I ended up editing the DXCC list manually for the 197 entities I have not worked.  NOTE: Do not take too long editing your list without SAVEing it as you can be logged out of HamAlert and will have to start over.  (This is the voice of experience talking!)

The first time I did this I was getting a lot of spots from VK's for VK and ZL stations which I need.  But, that was just Too Much Information (TMI) that I could not use.  This was because HamAlert was processing spots from everywhere to generate my alerts.  So, I set a condition where the CQ Zone of the "Spotter of the DX" had to be in the U.S. or Canada (Zone 3, 4, and 5) - see above image.  That stopped the spots completely.  But would it still work the way I wanted?  Since I could see on the Cluster that U.S. stations were working Brazil, I edited the DXCC list so that it showed I needed Brazil.  The alerts started coming in (only from U.S. hams) so I knew I had it working.  Editing the DXCC list to remove Brazil from my "needs" and the PY alerts stopped.

Then, a spot for ZP, Paraguay, appeared!  That was one I need!  But, after rushing to the radio, I did not have propagation.  Still it alerted me to the "possibility" of a ZP in the future.  Below is a screenshot of what appeared on my cell phone.  I received an alert sound in CW and the alert information appeared on my phone's Notification Screen just like other news or weather apps.


As "Sources" I chose spots from the "Cluster" and spots received by "PSKReporter."  That way, if a station copies a country I need but they do not post it to the Cluster, and if they have WSJT-X or JTDX set to send their reception information to PSKReporter - I'll see that spot!  No need to just depend on ONLY stations who choose to spot a station on the Cluster. 

The second night after setting this up my phone started receiving alerts from hams on the West Coast spotting VK and ZL stations.  BINGO!  Just what I wanted.  No alerts "from" VK or ZL hams.  ONLY alerts from those in the U.S.

With the 6-M season just around the corner and the Sunspots ramping up, I have great hopes that this app will assist me in working more New Ones!

Saturday, August 20, 2022

Custom-Made Driven Element Measuring Tool

In tuning my InnovAntenna LFA 2-M yagis (and later my XPOL antennas) I needed a simple way to measure the Driven Element (DE) dimensions.  The manual for my 2-M antennas says:

Hose clips are ready to place on the driven element sections and need to be loosened to allow the insertion of the end-loop element sections. The loop end sections are easy to identify and once inserted should be tightened to around 0.890m from the inside of the loop section one side, to the inside of the loop section on the other side. This loop will need adjusting once the antenna is complete with the above measurement being the starting point.

According to the manual for my 2-M antennas above, the DE loop sections should initially be set to around 0.890m from the inside of the loop section on one side, to the inside of the loop section on the other side.  I found it really difficult to measure this distance across the square boom while I was trying to adjust them.  So, I measured the width of the boom at 38mm and deducted that from the 890mm total distance (890 - 38 = 852mm).  Dividing that by two gives 426mm from the inside of the DE to the closest side of the square boom.  

The solution thus became obvious.  Since the antenna boom is square, a tool could be built to measure from the closest side of the boom to the inside of the DE loop.  So I took a short length of 1/2" X 1/2" wooden molding and taped a printout of a millimeter scale to it.  The printout of the mm scale was not 100% accurate but I decided it would serve perfectly as a "relative" measuring tool.  That is, if I measure one Driven Element at 426mm according to this tool, I could measure another to 426mm and they would be the same.  It would not matter if the distance was actually 427mm.  Just being able to adjust the corners of each DE loop to be the same distance and then adjust the DE loop on the other side of the boom to be the same was my goal.  I positioned the printout on the wooden stick so that the "Ø" on the printout was exactly 300mm from the far end.  That made it easy to adjust the DE's to the initial setting of 426mm (just add 300mm to the scale reading) and then move the DE's in easily repeatable amounts.  (Click on any image to view a larger size.)

Custon-Made Driven Element Measuring Tool

All I had to do was to place the end of the wooden stick on the side of the square boom and then measure to the inside of the DE using the scale on the measuring tool.

DE Measuring Tool in Use

Once I tightened the hose clamp (Jubilee Clip in the U.K.) on one end of a DE, it was extremely easy to move the measuring tool to the other end, adjust it to the same measurement and then tighten that hose clamp.  This made the adjustable portion of that DE square to the boom.  Then I just used the same measurement on the tool to set the DE on the other side of the boom.  Simple!  I sure wish I had thought of this back in 2017 when I was trying to adjust my 13-L antennas!

And, after I posted the above, Carlos, WD6Y made a similar tool for 70cm:


Wednesday, April 21, 2021

Mouse Without Borders

    Eureka!  What a WOWZER of a morning this has been!!!

Today I stumbled upon a piece of software that will make my life just SOOOO much easier.

You see, I have two separate computers in the shack as you can see in the photo on the right  (Click on any photo to see a larger image.)  Both have monitors mounted on a stand which let me see FOUR separate screens at the same time. But since they are separate computers, I need TWO keyboards and TWO mice to control them.  Not only that extra hardware is required but my brain has a certain degree of difficulty in navigating between the two computers.  90% of the time I grab the wrong mouse and 20% of the time I type on the wrong keyboard.  It's a HOT MESS!

Once I complete my XPOL EME antennas and the associated hardware/software, I plan to run MAP65 and Linrad on one computer (the Dell T1700) to get the highest performance possible.  But, at times I will need to copy text from that computer to the other one for use on one or another Chat pages or to enter into my logging program.  I may also want to copy a screenshot from one computer to the other as well.

It is of course possible to control multiple computers using only one keyboard and mouse by adding a piece of additional hardware like a KVM  (Keyboard, Video and Mouse) switch.  Still, you have to REMEMBER to flip that switch when you want to control the other computer.  However, even with a KVM switch, you can not transfer text or files between the computers.  Wouldn't it be nice to not have to flip that KVM switch or even use a second keyboard or a second mouse when working with both computers AND be able to Copy/Paste text or transfer files?  YES IT WOULD!

For quite some time I have struggled with the 2-keyboard/2-mouse setup when I have needed to copy information from one computer and paste it in the other computer.  My work-around was to copy the text then paste it into an email in my Gmail account.  Then open that same email on the other computer and AGAIN copy the text before I could paste it where I wanted.  Definitely not a satisfying process and certainly one I did not relish using.  

Today I did a Google search for this string - "transfer clipboard contents between 2 computers on the same network."  In the results that were displayed, the first item I looked at (a Post on Superuser.com) had what seemed to be the answer.  A Microsoft software product called Mouse Without Borders seemed to do everything I wanted and MUCH MORE!

Mouse Without Borders is a Microsoft Garage project by Truong Do. Garage projects are side projects that Microsoft employees like Truong build for fun on their nights and weekends. Mouse Without Borders was designed for people who use many computers in the same room. For example, a laptop or tablet that you take to meetings might sit right alongside the desktop PC in your office. 

If you are like me with more than one computer, and they are all on the same network and running Windows, then you should try Mouse Without Borders. This application allows you to move your mouse between computers like you would if you had a dual monitor setup. The nice thing here is that copy and paste works well between all computers. You can easily move your mouse on the monitor of computer A, copy something and then move your mouse off of that screen to the monitor of computer B and paste it.  Plus, this software will allow you to use one mouse on as many as FOUR separate computers!  Amazing!

Although I have not tried it, it appears that you can use this software with your desktop AND a tablet/laptop together!  WOOF!  What a concept!  In my situation with two desktops each having two monitors, I can just move my mouse to any of my four monitors with ease, just like they were connected to the same computer.

CLICK HERE for the Setup/User Guide which contains the step-by-step instructions for installing the software on all computers.  The most recent version (2.2.1.327) was published on April 6, 2021.  Supported Operating Systems are: Windows Server 2003, Windows Server 2008, Windows Server 2012, Windows Server 2016, Windows 7, Windows 8, Windows 8.1, Windows 10, (32/64 bit). .Net 4.0 & up.

Would you not want to have an incredible mouse that can seamlessly move from one machine to another?  If you are new to the idea of using a single mouse and keyboard to work with multiple machines or if you are having more or less troubles while using other software/hardware KVM then you REALLY want to give Mouse Without Borders a try. The first impression of new users are: “It is incredible! It is impossible!”

Downloading, installing and setting up the software on both computers took less than 10 minutes.  My mind is blown wide open by this!  My use of two computers just became MUCH more efficient and TONS more pleasant!  If you have more than one computer and want to use both from one keyboard/mouse, YOU NEED TO INSTALL THIS!

Wednesday, January 27, 2021

Replacement for Wire Nuts

First, a disclaimer.  I have never been an advocate of the use of Wire Nuts for connecting together multiple wires.  Too many times I have seen where the nuts have been loose or even fallen off the wires they are supposed to be connecting together.  To combat this I have seen where the installer twisted on the Wire Nut and then taped the connection to keep the nut from falling off!  But, for as long as I can remember, it seems that they have been the standard method used for splicing wires in electrical wiring.  

The photo at the upper left is a cut-away view of a Wire Nut and you can see the imprecise way this method of connection is supposed to work.  (Click on any image to see a larger version.)  Standard wire nuts are roughly conical in shape and usually have ridges on their sides so your fingers can get a good grip. Some types have little side wings instead of ridges. Inside the plastic cone is a little square-cut spring that provides tension on the wires to hold them securely.  As you tighten the wire connector by twisting it, the spring draws tighter around the wires.

But recently I have found what I think is a superior way to join together 2 or more electrical conductors.  It is the Wago line of  LEVER-NUTS® which is available at Amazon, Lowe's, Home Depot, etc.  In the photo at the right you can see how the Wago 221 model compares to a Wire Nut.  The Wago connector is smaller, faster to install, able to accomodate multiple wire sizes including solid and stranded conductors, and in my opinion, MUCH more secure!

Wago Connectors were designed to make the splicing process easier without needing tools. The Wago clamp technology makes for faster installation and eliminates maintenance. All these connectors use clamps to terminate stranded, fine stranded and solid conductors.

Once the wire is inserted into the connector, the Wago clamp secures the conductor and encloses its insulation. This guarantees that the conductor does not come into contact with any live parts, which in turn increases safety.

Installation is simple, pull the orange lever up, insert a stripped conductor, and push the lever back down - done. WAGO's 221 Series compact splicing connectors easily, quickly, and safely connect solid, stranded, and fine stranded wires ranging from 24-10 AWG.  The connectors come in two sizes with the 221-412, 221-413 and 221-415 (for connecting 2, 3 or 5 wires) able to accept all wire types from 24 to 12 AWG.  The "6" series (221-612, 221-613, or 221-615) is capable of connecting conductors from 20 to 10 AWG.

There is an older model called the "222" which is not made of transparent material.  I prefer the Model 221 which is transparent and you can clearly see whether your wire is properly positioned inside the clamping compartment.  But, the 222 model does accommodate wire sizes as small as 28 AWG so those could be useful to connect smaller conductors.

If there is a downside to the Wago connectors, it appears that you can only install ONE conductor per section.  Wire Nuts and Terminal Strips can accommodate more that one conductor for each connection but these Wago LEVER-NUTS® (for me) will replace the Wire Nuts for everything except the applications where I need a Terminal Strip.

One MAJOR advantage I see for the Wago Lever-Nut® is that the conductors are not deformed by twisting them when you connect them with Wire Nuts.  If you ever want to change that connection, it usually means you need to cut back the conductor and strip the insulation again.  With the Wago connectors, the conductors are NOT deformed and can be reconnected with no issues.  Simply lift up the lever and pull out the conductor.

Each Lever-Nut® has two test slots (or ports) that allows you to connect a meter test probe on the connection.  COOL!  You can see in the photo on the right how a Green test probe is able to slide right into the test slot to test the connection.

As I understand, Wago pioneered lever nuts and received UL certification on the first such device in 2003.  Obviously I was a bit "late to the party" in discovering this product!  Generic 221 and 222 style lever nut connectors can be found, but Wago is such a leader in this space that the term “Wago connector” is now applied as a general term.  In reading the comments from various users it appears that some of the "knock off" or imitator connectors are missing some of the features or the quality of the Wago brand.


As you can see on the bottom left image, there are also "mounting carriers" available for all 221 Series Splicing Connectors (2, 3 and 5 conductors) and can be installed either vertically or horizontally. Secure the carrier by simply snapping it onto the DIN-rail or using screws on smooth surfaces. Flexible mounting clamps simplify both connector insertion and removal.

The "mounting carriers" also allow you to mount 2, 3, and 5 conductor Wago connectors to any flat surface by just screwing down the mounting carrier.  You can mount them vertically or horizontally and the Wago connectors simply snap into the carrier.

The photo on the bottom right shows a cut-away view of the Wago 222 connectors.  Both the 222 and the 221 models are UL approved and rated for 600 volts at 20 amps. 

From my research, I would choose to ONLY use the Wago brand because of the quality issues I noted for the "look-alike" knock-off brands.  As in most circumstances in life, "You Get What You Pay For!

To check these out I purchased an assortment containing 10 of the 2-port, 10 of the 3 port, and 5 of the 5 port from Amazon.  My cost was $16.43 including tax (free shipping with Prime.)  That is about $0.66 per connector for this assortment.  If you were to buy a higher quantity, the price, of course, goes down.  For example, an order of 100 of the 2-Port model runs about $0.29 per connector.

Here is a 3-minute VIDEO that demonstrates and describes the 221 Series of Wago LEVER-NUTS®.

I will be passing some of my assortment of Wago connectors off to my Grandsons for them to put in their tool box for future use.  That's just what a Grandpa does!

Monday, December 28, 2020

Weatherproof Cable Entry Port

Roxtec EzEntry™ 10/10
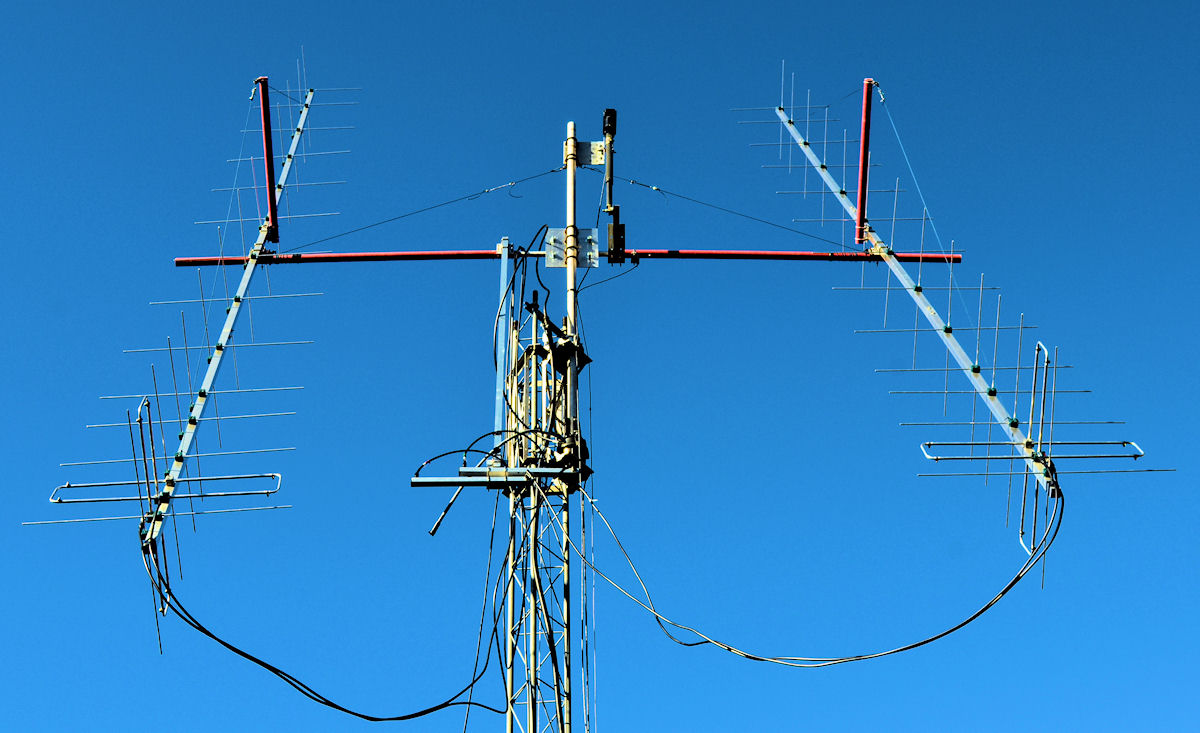
When I built my current EME antenna system 3 years ago, I used a PVC box to hold the T/R relay and the LNA close to the antennas (see photo at left.)  Since I was using cables which already had the terminations installed and I did not want to remove those connectors, my only option was to drill a hole large enough for the connector to pass through the wall of the box.  Those holes are marked by Purple arrows in the image.

As I began construction of my new XPOL array, I needed to purchase a new and much larger plastic box to hold the multiple relays (5 this time) and the two new LNA's.  Because I have purchased a pair of matched 1/4 λ cavity LNA's for this system, I need a MUCH bigger box than before.  These LNA's (click HERE to see them) are 17-inches long.

This new system will require FIVE large coaxes plus multiple control wires to enter the box.  In the old system I had THREE large coaxes and needed to drill holes in the box large enough to pass the connectors on the ends of the cables.  I was never able to manage to waterproof those large entry holes well enough to keep water out of the box.  As we all know, water is the enemy of electronic equipment.

Looking for a more elegant solution, I came across the Roxtec EzEntry system.  This solution provides a cable entry seal that can be used to weatherproof pre-terminated cables without the need for removing the terminations.  That is AWESOME! You can use any cables with connectors already installed and be assured the Cable Entry Port is weatherproof and insect-proof.  It is also a system that can be modified to add or remove cables with ease.

Different size cables are easily installed.  To adapt the sealing modules to different cable sizes, simply peel off layers from each half of the blue modules until it fits the cable.  It is important that you leave a  0.1 to 1 mm gap between the halves of the blue module when placed around the cable.  Unused blue modules can stay in the frame for use as "spares" in the future.  During installation all parts are lubricated with the supplied lubricant.  Click HERE for a 5-minute video of the installation process.

Module Installation
Once all the modules and cables have been installed, an integrated compression unit is tightened with a Hex key.  This compresses the modules for sealing, squeezes out the excess lubricant, and the installation is complete.

I was really excited to learn about this product which I believe will greatly improve my ability to keep water away from the relays and LNA's for my new array.  This system is available in many sizes but I decided to go with the Roxtec EzEntry™ 10/10 model.  It allows for up to 10 cables each ranging in size from 0.138-0.650 in (3.5-16.5 mm).  This is more than large enough to accomodate 1/2-inch Heliax which has a diameter of 0.51 inches (12.95 mm.) Overall size of the unit is 2.76 x 6.61 in (70x168 mm) which will easily fit my new box.

I also think it is important to note that you can install the Roxtec EzEntry frame in the box without the blue modules and run the various cable into the box through the frame.  Once everything is connected and positioned, THEN you can install the blue modules to seal the cables.  This makes the process very convenient.

I have found several suppliers of these products online.  The model I have decided to use (Roxtec EzEntry™ 10/10) is available for about $85 including shipping.  I feel that is a super low price to pay in order to weatherproof cables entering my Relay/LNA box.